Journal List > J Rhinol > v.29(1) > 1516078482

Lee, Won, Hyun, Song, Jang, Choi, Hong, Kim, Kim, Kim, and The Korean Academy of Facial Plastic and Reconstructive Surgery: Dissection Manual for Open Rhinoseptoplasty in a Silicone Nose Model

Abstract

Open rhinoseptoplasty has been widely performed in the field of otorhinolaryngology. However, from the perspective of beginners, rhinoseptoplasty is a hard-to-learn surgery that involves a relatively steep learning curve. Therefore, practical guidance is essential to enhance the skills needed for excellent surgical outcomes. Here, we provide a step-wise dissection manual using a commercialized silicone nose model designed for rhinoseptoplasty. The contents include general approaches with regard to transcolumellar inverted V incision, flap elevation, osteotomy, septoplasty, modification of the lower lateral cartilage for tip surgery, and dorsal augmentation using silicone implants. In addition, we introduce novel techniques such as dorsal augmentation using a ready-made mold with tissue glue applied to diced cartilage and polycaprolactone mesh for rhinoseptoplasty. The present study also provides photos of individual surgical procedures using a silicone nose model for actual guidance. The authors expect that this manual will help beginning rhinoseptoplasty surgeons improve their confidence.

INTRODUCTION

Rhinoseptoplasty tends to require a long learning curve and sometimes can cause undesirable results, not only for beginners but also for experts. Excellent surgical outcomes may be derived from a detailed understanding of basic anatomy and surgical skills. For this reason, before starting the actual rhinoseptoplasty, a sufficient step-by-step practice is needed without targeting a living patient. However, in reality, there is a limit to systematic learning on rhinoseptoplasty through actual surgery during the training period.
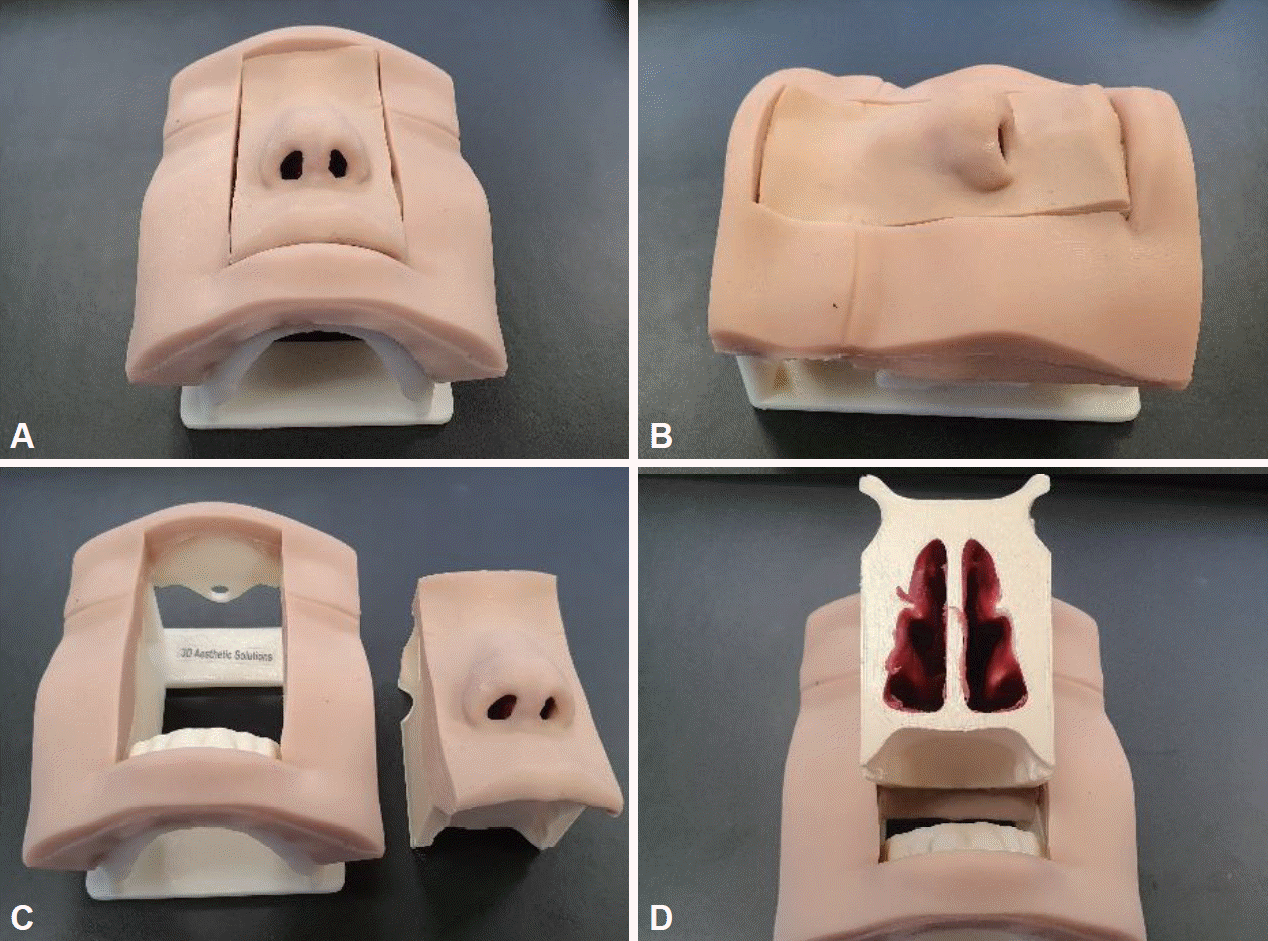
Numerous materials have been used for practical learning of rhinoseptoplasty, such as pig or rabbit nose, chicken cartilage, and even 3-dimensional products similar to the human nose. Recently, the surgical simulator for rhinoseptoplasty (Simulare Medical Corp., Ontario, Canada) has been developed commercially (Fig. 1). In this paper, the authors describe the dissection manual using this surgical simulator. The simulator, made of silicone, comprises a nasal part for the operation and a facial part for the support. This surgical model also provides a detailed operating type, such as the deviated nose, hump nose, cleft nose, and Asian nose. In the present study, we describe a practical stepwise approach based on the hump nose. The model’s strengths include anatomically accurate, multilayered structures and realism similar to a real human body. Hence, this can allow sufficient practicing environments for basic and even complex procedures in a safe environment.
This dissection manual aims to provide practical guidance regarding numerous surgical techniques in rhinoseptoplasty, particularly for beginners. The dissection manual can help enhance the surgical skills of rhinoseptoplasty through a stepwise approach. We focus on the performance of the basic technique that can be readily applied to actual surgery. In addition, we introduce novel techniques using diced cartilage covered with tissue glue, which is made using a mold or a 3-dimensional polycaprolactone (PCL) mesh. Furthermore, this manual could also be used for cadaveric dissection in future academic courses.

APPROACH TO THE TIP AND DISSECTION

Transcolumellar inverted V incision

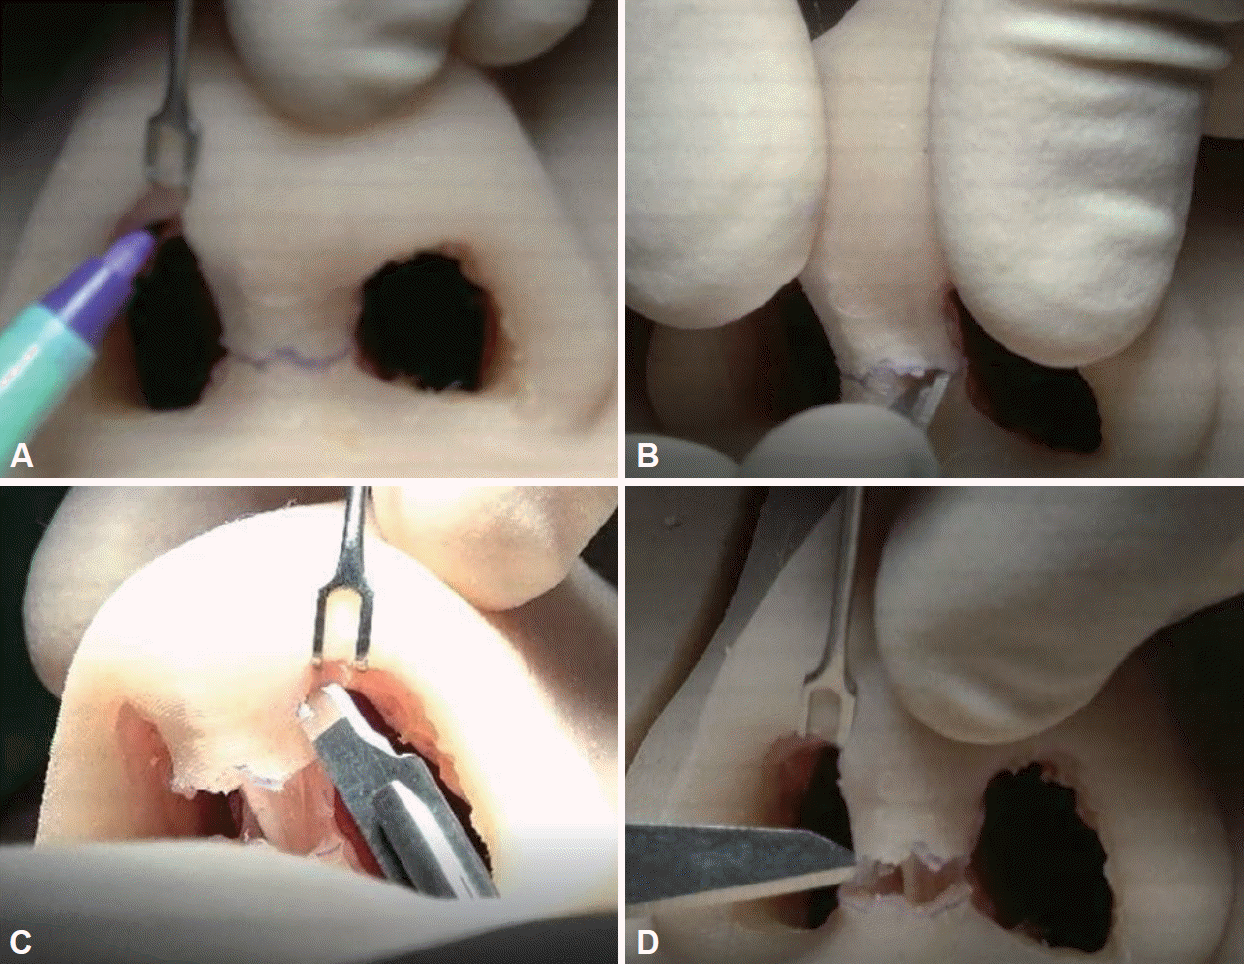
Mark and connect three dots in an inverted V shape on the narrowest area of the columella and make an incision with the #11 blade (Fig. 2A). Extend the markings to the left and right corners at the bottom of the inverted V and then mark3 mm medially from the lateral side of the columella for the lateral columellar incision (Fig. 2B). Note that the caudal margin of the lower lateral cartilage (LLC) is located more in the posterior and cephalic directions on the lateral side. Incise the vestibular skin along the caudal margin using blade #15 along the outline. The marginal incision should be made close to the caudal margin of the LLC in order to avoid postoperative hypertrophic scarring (Fig. 2C) [1]. A lateral columellar incision is made along the medial crus of the LLC from the incision line marked on the lateral side of the columella (Fig. 2D). Be careful not to cut the medial crural cartilage. The lateral columellar incision is connected to the previously performed marginal incision. Two methods are available for mid-columellar incision according to the order of the procedures.
1) Insert converse or iris scissors, pass through both lateral columellar incisions, and pass them through to the opposite side as guide scissors. An incision is made on the mid-columella skin using a #11 or #15 blade, or converse scissors, and connected to the lateral incision. For a stable connection, fix the tip with the thumb or index finger of the opposite hand, or hook the Cottle elevator and slightly pull it upward to fix the columella area. The columellar flap is carefully elevated over the medial crus through the supra-perichondrial plane.
2) Starting from the inverted V region in the middle, incisions are made to the left and right corners at the bottom to the extent of the lateral columella area. The columellar flap is carefully elevated along the medial crus from the lateral region through the supra-perichondrial plane. Perform a relatively deep incision because there is no cartilage in the center of the inverted V region [2] to ensure that the skin edge is not beveled at the corner to achieve a clean margin. Likewise, this incision should be performed while being fixed with the opposite finger or instrument.

Flap elevation of nasal tip and dorsum

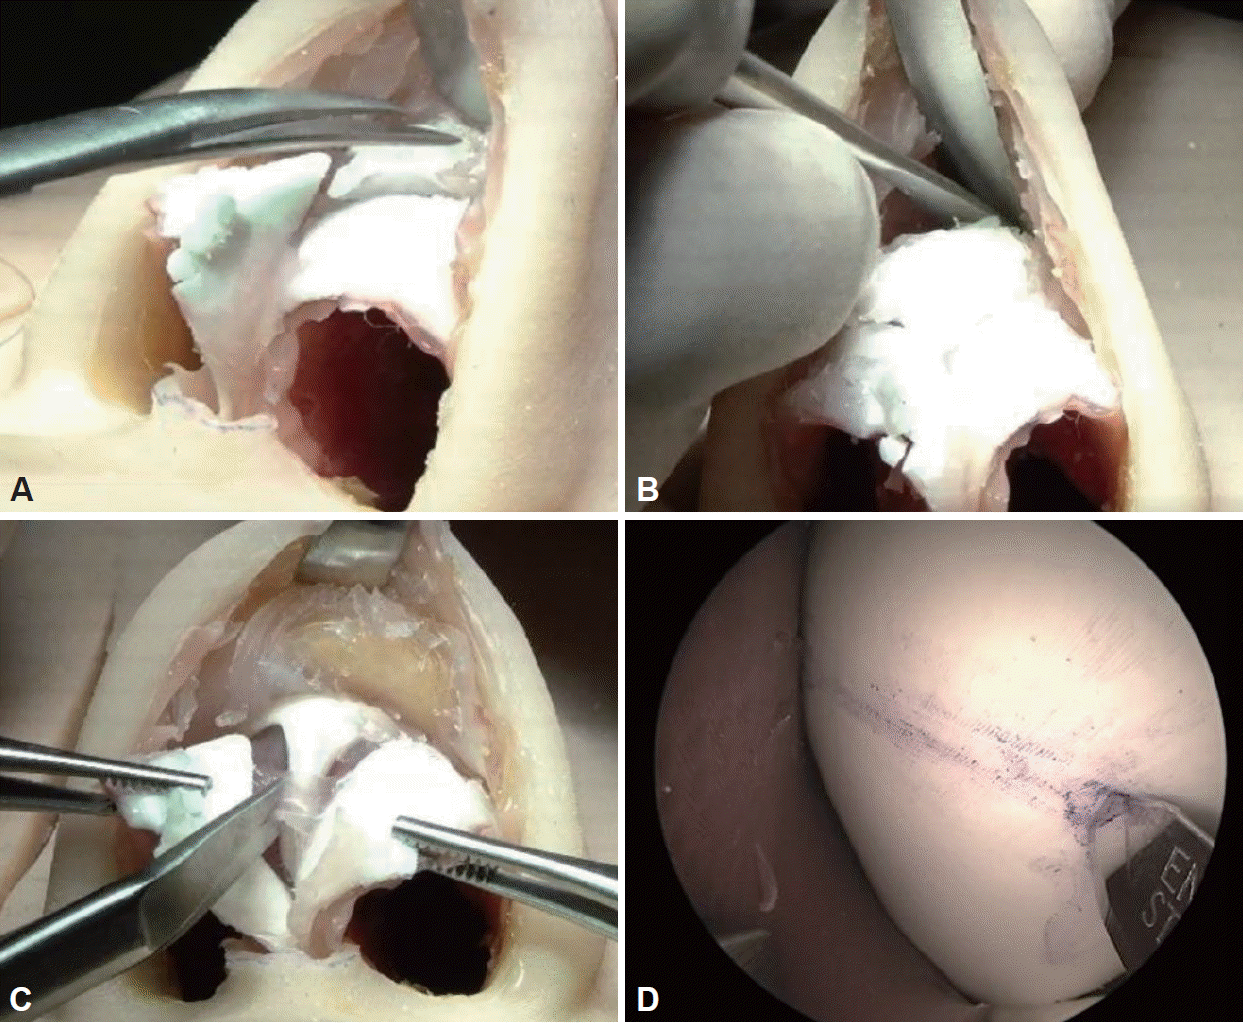
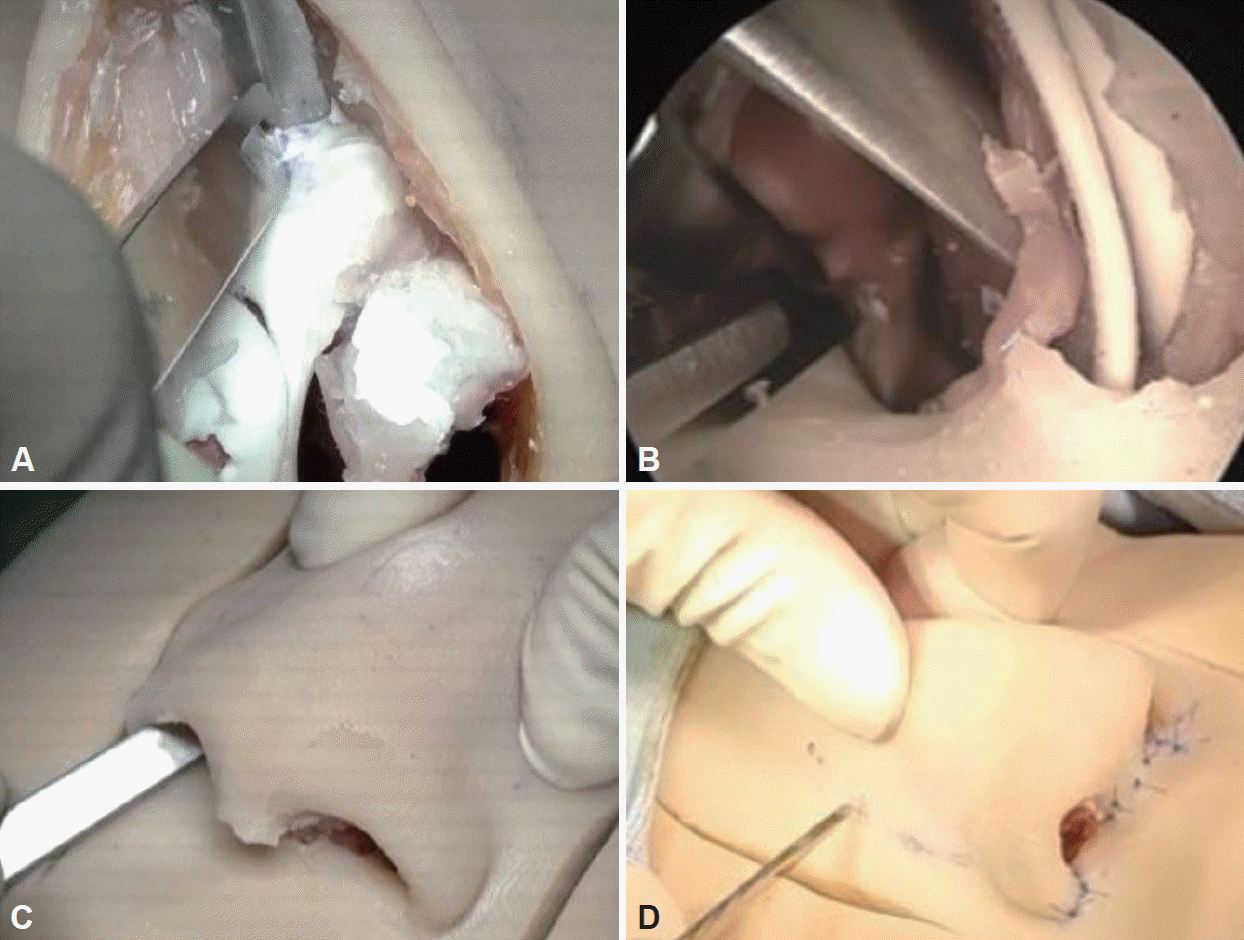
While elevating the columellar flap to the infratip lobule, dissect toward the lateral crus after identifying the intermediate crus and dome of the LLC. Using a two-prong retractor, the assistant counter-tracts the flap upward. While performing supra-perichondrial dissection, the lateral crus is dissected along the previously made marginal incision [3]. During this process, 3-point traction around the LLC helps with the dissection [4]. Afterward, the soft tissue on the dorsum is elevated to minimize bleeding by dissecting below the superficial musculoaponeurotic system (SMAS) layer (Fig. 3A). At this time, the method of pushing the soft tissue in the cephalic direction using a cotton swab or gauze and hanging the retractor under it makes elevation easy without bleeding because the surgical plane below the SMAS layer is avascular. The bony hardness can be felt using a Freer elevator or Joseph elevator (Fig. 3B). The bony area has a slightly rough feeling, whereas the cartilaginous area feels soft. The periosteum is incised with a #15 blade (or Joseph knife) and elevated with a Joseph elevator. When planning for radix augmentation, particularly using alloplastic implants, the dissection pocket should be made according to the size of the implant. Soft tissues should not remain inside the pocket. After creating the pocket, it becomes difficult to remove the remaining tissue. Both sides should be elevated symmetrically so as not to tilt to one side. Otherwise, implant mobility can occur later [5].

Septal cartilage harvest

The anterior septal angle could be the landmark for the open dorsal approach in rhinoseptoplasty [6]. Therefore, the membranous septum between the dome of the LLC is first dissected, and the caudal septum is dissected and exposed through the anterior septal angle. The sub-perichondrial plane can be easily found by dissecting the exposed caudal margin of the septum cartilage while rubbing it with scissors (Fig. 3C). Dissection between the septal cartilage and mucoperichondrium with the Freer elevator (or converse scissors) is done to incise the connected area between the septum and the upper lateral cartilage (ULC) from bottom to top. To harvest the septal cartilage, leave the L-strut, mark the cartilage to be excised, and harvest the central part using a #15 blade, D-knife, or Freer elevator (Fig. 3D) [7]. Partial resection of the connected area between the ULC and nasal septum enables harvesting in a wider field of view. Resection is performed to protect the contralateral septal mucosa using a long nasal speculum.

OSSEO-CARTILAGINOUS VAULT SURGERY

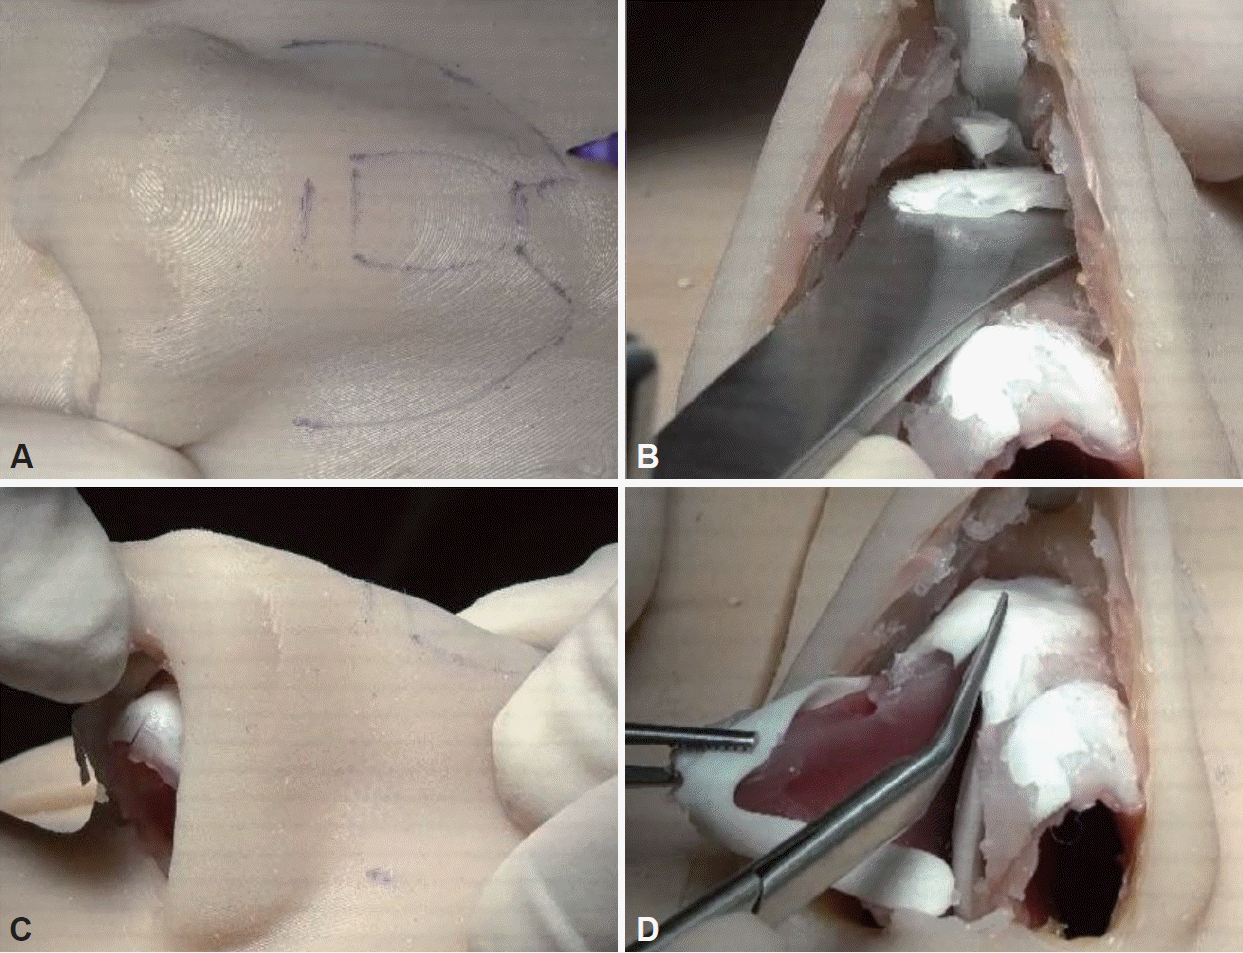
Mark the line or dots for the humpectomy and medial and lateral osteotomy (Fig. 4A).

Hump resection

En-bloc resection

After fully exposing the dorsum, an incision is made in the periosteum at the caudal margin of the nasal bone with the #15 blade. The periosteum is detached using a Joseph elevator. Using the #15 blade, the cartilaginous hump is resected from the keystone area between the ULC and the nasal bone. Then, the incision is slowly and horizontally made cephalic-to-caudal direction while paying attention to the symmetry. After placing the Rubin osteotome at the bony-cartilage junction, the hump is excised in the cephalic direction (Fig. 4B). The excised hump is removed using forceps such as Kelly forceps. In addition, the nasal bone can be trimmed with a rasp to lower the hump height or to smooth out irregularities (Fig. 4C). If indicated, a lateral osteotomy is performed to close the open roof deformity [8].

Component resection

After separating the septum and ULC (Fig. 4D), the nasal septum, nasal bone, and ULC constituting the hump are excised independently. If there is an excessive area in the ULC, it can be excised with scissors or a blade in line with the lowered septum. Alternatively, it can be used as an auto-spreader graft that folds the excessive cartilage and places it between the septum and the ULC. Supplement with a spreader graft if the cartilaginous dorsum is weakened or to prevent nasal valve problems [9].

Medial and lateral osteotomy

Medial osteotomy

Place the straight (or curved) osteotome between the septum and the ULC. Start at the median and advance toward the cephalic slightly outward (superior oblique direction) (Fig. 5A). Do not go above the line connecting the inner canthus on both sides [4]. If necessary, an intermediate osteotomy can be added before the lateral osteotomy [10].

Lateral osteotomy

A horizontal incision is made at the attachment site of the inferior turbinate using a #15 blade (Fig. 5B). Elevate the periosteum, inside and outside of the pyriform aperture, slightly along the osteotomy path using the Joseph (or freer) elevator. The osteotome is positioned and firmly pressed against the pyriform aperture and then slightly hammer into the bone: in the vicinity of the pyriform aperture, it is directed slightly downward, proceeds upward along the naso-facial groove, and gradually moved inward and upward to meet the medial osteotomy site (high-low-high osteotomy) (Fig. 5C) [11]. Additional percutaneous osteotomy can be performed to connect with the lateral osteotomy if necessary [12].

Percutaneous osteotomy

Insert a 2 mm osteotomy by incising and penetrating the skin percutaneously (Fig. 5D). When one hole is made, the osteotome is removed and moved to the immediately adjacent position to make a new hole again under the same percutaneous incision. Skin incisions are made in 1–2 places. If the central portion of the nasal bone remains thick ethmoid bone, it may not be corrected after conventional osteotomy. In this case, a small incision is made with a #11 scalpel in the connected area of the medial and lateral osteotomy. Incomplete osteotomy by conventional osteotomy can be performed by percutaneous osteotomy [13].

TIP SUTURING

Transdomal suture

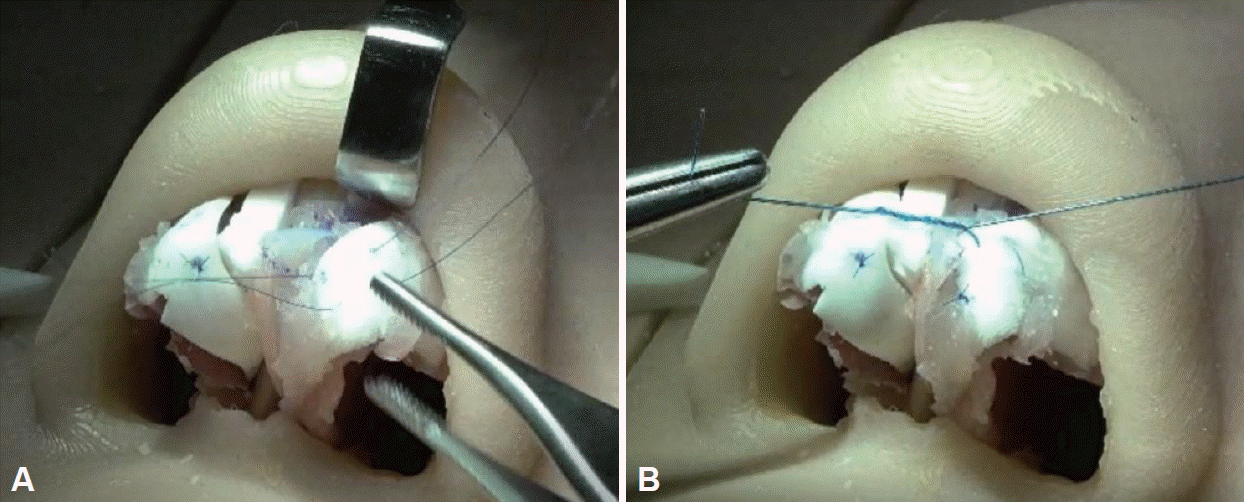
Infiltrative injection of local anesthesia is performed before the suture, and then the vestibular skin below the LLC is dissected. A horizontal mattress suture is applied to the dome and lobule of the middle crura on both sides (Fig. 6A). Depending on the case, it may be performed on only one side. It is cosmetically preferable that the caudal portion is slightly longer than the cephalic portion of the transverse axis passing through the LLC. It is better to make the knot on the medial side rather than on the lateral side. If the knot is too tight, the tip becomes too sharp and unnatural; therefore, it is advisable to consider the angle and shape of a normal dome and tie it with appropriate strength. Because Koreans often have a weak LLC, tip asymmetry may occur following transdomal sutures. In addition, due to the thick skin, it is often difficult to improve the tip definition using the suture technique alone. Therefore, before the procedure, the cartilage strength and skin thickness should be well evaluated to decide whether to perform the suture technique [14]. Furthermore, since convexity can occur after transdomal suture, it is sometimes necessary to perform cephalic resection of LLC additionally from an esthetic point of view [15].

Interdomal suture

Interdomal suture binds to both domes of the LLC after transdomal suture: this can provide symmetry and stability to the LLC. Interdomal suture can be performed after transdomal suture or alone [16]. The knot is made to the cephalic end of the middle crura just behind the dome (Fig. 6B). If a columellar strut is performed, the needle enters just below the left transdomal suture knot and passes directly above the middle columellar strut. It is then sutured with the same site on the opposite right middle crura, just below the transdomal suture knot. It is usually performed 2–3 mm behind the caudal border of the crura. It is paramount not to suture too tightly to avoid pinching deformity of the tip. Decide the tip width to make it diamond-shaped.

CARTILAGE GRAFTING

Onlay graft

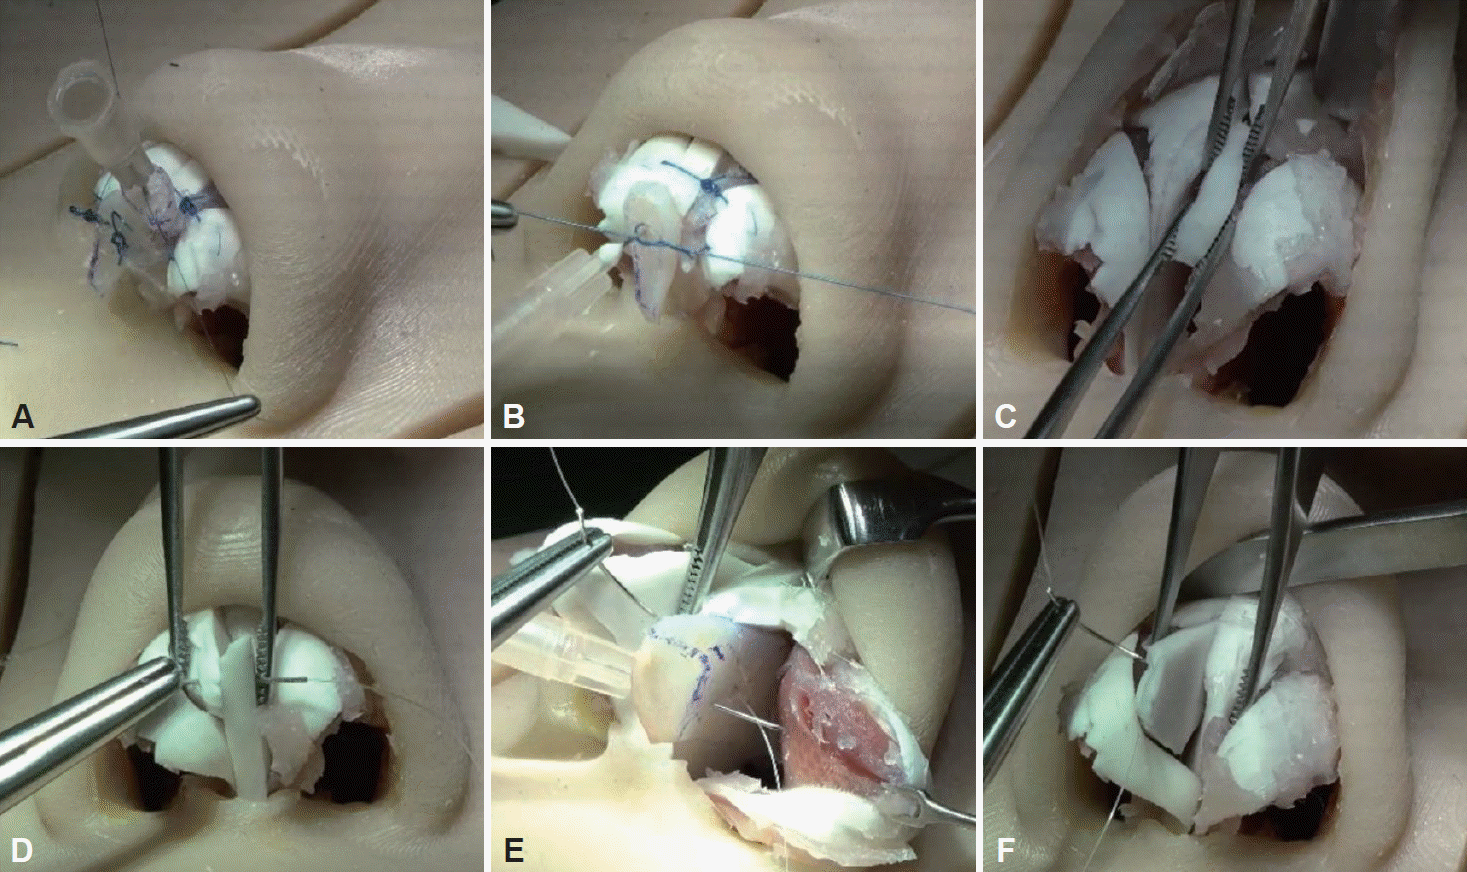
Although easy to perform, onlay graft often become the cause of revision surgery [17]. It can be performed to increase the projection of the nasal tip with multiple stacked onlay grafts (Fig. 7A). In addition, it can smooth the pinching deformity of the nasal tip or protect the skin of the nasal tip from the implant. Generally, it is performed at the end of the entire rhinoseptoplasty procedure. If a shield graft is used, onlay graft can be omitted. The septal cartilage is often used for onlay grafts, and the conchal cartilage can also be performed using natural curvature. Tip onlay grafts often become transparent over time, requiring revision surgery. Hence, the edges should be beveled and trimmed well to avoid postoperative visibility, especially in cases of hard graftings, such as the septal cartilage. In contrast, even in the case of soft graftings, such as the conchal cartilage, the shape of the grafts could be visible on the skin. In particular, this occurs more often if the cartilage supporting the tip is strong, such as in the costal cartilage. In any case, if the skin is thin, the graft is often visible on the skin, and it is often necessary to reinforce the dermis or fascia during revision surgery. It is essential to inform patients of these characteristics preoperatively. For a patient with thick skin, if the width of the implant is wide, the nasal tip can easily be bulbous. For a patient with thin skin, and if the width of the implant is too small, the nasal tip tends to be pinched. Therefore, if the skin is thick, it needs to feel sharp. If the skin is thin, the implant should not be high, but in cases of inevitable augmentation, the implant should be strengthened with fascia or soft tissue. When augmenting the nasal tip with multiple onlay grafts, the implant may move downward over time and cause tip ptosis; therefore, it is critical to fix stacked grafts well with a suture.

Shield graft

Carve a shield-shaped tip graft using harvested septal cartilage. The width of the superior margin should be approximately 6–8 mm, and the margin should be beveled to make it smooth in appearance. After placing the grafts in the correct position by considering the height and angle, four or more places are fixed to the medial crus of the LLC with 5-0 polydioxanone (PDS) (Fig. 7B). After placing the grafts in the correct position while considering the height and angle, the grafts are sutured to the medial crus of the LLC with four to six stitches using 5-0 PDS. To avoid tilting back and cephalic rotation, the back-stop graft could be placed in the rear part of the shield graft [18,19]. Shield grafting is a sophisticated technique that can increase the tip projection in Asians, while the grafts could be palpable in the margin or tilted in many cases due to its hardness. Therefore, ensure that there is not much difference in height between the newly created dome and lateral crus of LLCs.

Spreader graft

Separate the perichondrium of the septum and the ULC. After preparing the spreader graft by cutting the cartilage horizontally, place it into the space where the septum and ULC are separated in line with the top of the septum and temporarily fixed with a #26-gauge needle (Fig. 7C). A needle of adequate size (such as 4-0 PDS) facilitates engaging all structures in a single pass (for instance, right ULC, right spreader graft, septum, left spreader graft, left ULC) [20].

Columellar strut

Create a pocket for inserting the columellar strut by dissecting the soft tissue between the medial crus and the anterior nasal spine. Before fixing the columellar strut, temporarily place the columellar strut between the separated medial crus and hold it with a #26-gauge needle, and suturing the medial crus and columellar strut on both sides in several places. Then, secure it to the medial crus with several mattress sutures placed through the vestibular skin. Position the columellar strut slightly above the anterior nasal spine without tight sutures as in the floating type (Fig. 7D) [21].

Septal extension graft

These grafts are designed according to the intended purpose, such as lengthening, projection, and rotation, using the harvested septal cartilage. Before fixing the septal extension graft (SEG), if the caudal septum deviates, it should be corrected first. Otherwise, the tip might be misaligned long-term. If the caudal septum is weak, SEG is applied after strengthening the caudal septum with a spreader graft or batten graft. If the harvested cartilage is large enough, it can be broadly overlapped with the caudal septum to strengthen and extend simultaneously when designing the SEG (Fig. 7E) [22]. It is essential to position the SEG on the midline and fix it firmly with 3–4 sutures on the caudal septum. After pulling both LLCs to the desired position, they are sutured together with the intermediate crus of both LLCs (Fig. 7F). If necessary, the membranous septum and SEG are penetrated and sutured together to secure the SEG. Additional grafting can be performed at a new location of the tip if needed.

DORSAL AUGMENTATION WITH SILICONE

Selection and design of silicone implant

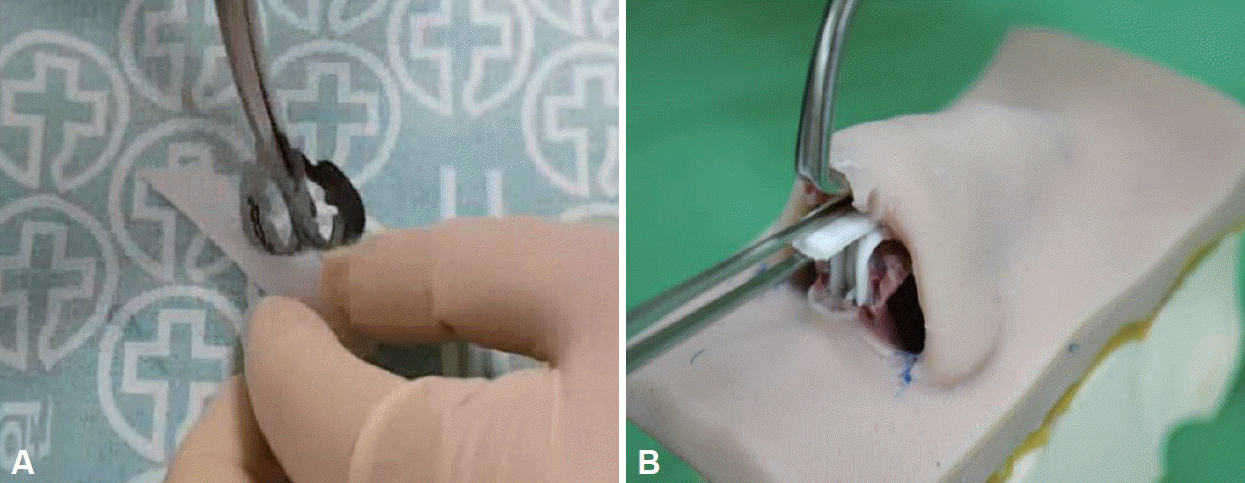
According to the esthetic purpose, such as dorsal height or shape, determine the implant thickness and type. The implant is thoroughly disinfected from time to time using betadine solution and saline to minimize the risk of inflammation. While silicone implants can be trimmed using a sterilized razor blade, #15 blade, U-shape knife, or iris scissors (Fig. 8A), various ready-made products are available in terms of height and shape. Therefore, it is advisable to select an appropriate implant and reduce manipulation during surgery as much as possible. In the radix area, ensure that the upper end of the implant is exactly placed at the deepest part of the nasofrontal angle, and no dead space is created. The nasal starting point varies from patient to patient, but the length of the implant is usually adjusted to the height of the eyelashes [23]. If there is a mild hump, the lower surface of the silicone implant is slightly trimmed at the rhinion area to match the height. The implant area corresponding to the tip area is appropriately cut. If the height of the dorsum does not match, additional grafting can be added to the lower surface of the thin side.

Insertion of a silicone implant into a dorsal pocket

If the silicone implant is inserted too superficially into the supra-periosteal plane in the radix area, the silicone implant can be visible and move later. It is beneficial for the pocket size for insertion to be slightly wider than the size of the silicone. Nevertheless, if it is too wide, there is concern about implant movement, and if it is too narrow, an insertion is difficult during the surgery. Therefore, a suitable size is recommended. Even if the pocket size is judged to be adequately adjusted from the top and the bottom, the size of the rhinion, which is in the middle position, is narrower than expected, making implant insertion difficult in many cases. This area should be dissected widely on both sides with a Freer or Joseph elevator. When holding the implant for insertion, it is grabbed at once using a long instrument such as Bayonet or Jung’s forceps (Fig. 8B). After confirming that the end of the instrument is positioned at the end of the radix, percutaneous needling is applied for transient holding, and then the instrument is removed. The forceps are removed while fixing the needle and implant well so that the implant is not removed while removing the instrument. In order to prevent implant movement, it is better to fix the caudal end of the silicone implant on both sides of the ULC. For more secure fixation, it can be suture-fixed with the septum at the anterior septal angle. The caudal end of the silicone places the supratip area, and it should be beveled and relatively low so that the supratip area does not become bulky and is naturally smoothed with the tip area [24].

DORSAL AUGMENTATION WITH DICED CARTILAGE

During surgery, the amount of cartilage remaining after septal reconstruction and tip surgery is sometimes poor for dorsal augmentation. In this case, the remaining cartilage can be crushed or diced and used with fascia or expanded polytetrafluoroethylene (ePTFE, Gore-Tex) for dorsal augmentation. There are several methods for dorsal augmentation using costal cartilage, such as a monoblock graft or a laminated stacking graft. In addition, it can be useful to make a dorsal graft with diced cartilage to prevent possible complications such as warping [25]. If the amount of harvested cartilage for dorsal augmentation is sufficient, the desired shape of the implant can be created using diced cartilage with tissue glue [26].
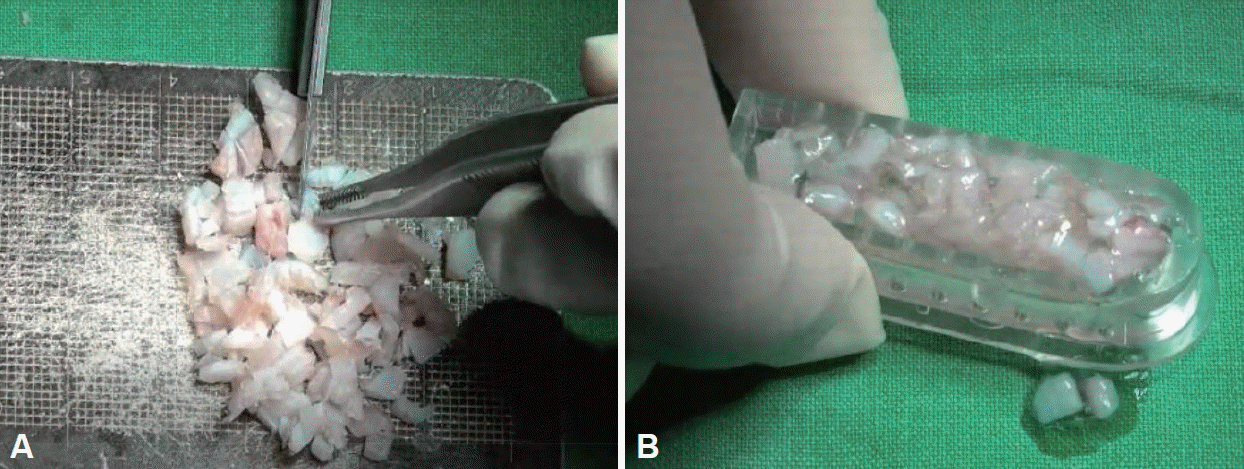
Pre-made 3D printed molds of different sizes (Jang Cartilage Mold, Nextcore Co., Ltd., Ulsan, Republic of Korea) can be used to achieve fine control of the shape, thickness, and length of the diced cartilage implant for dorsal augmentation. Jang Cartilage Mold (Nextcore Co., Ltd.) consists of a base template, a guarding frame with side holes, and a compressor with a handle. The actual procedure involves dicing all types of harvested cartilage, such as septal cartilage, conchal cartilage, and costal cartilage, using a dermatome blade or a scalpel smaller than 5 mm (Fig. 9A). After selecting a mold with the size of the required graft, the perichondrium or fascia can be laid on the base of the mold as covering materials for implants, which sometimes may not be required. Apply a small amount of tissue glue inside the mold, put diced cartilage, reapply the tissue glue, put the diced cartilage in, and press the mold compressor to drain the remaining glue out through a small hole on the side of the mold (Fig. 9B). A dorsal implant with diced cartilage and tissue glue is created by separating the mold after the hardening period.
Using a silicone practice model, the implant will be created by placing melted gelatin instead of tissue glue, along with diced pig cartilage in the mold, which is pressed with a compressor and placed in ice water to shorten the hardening time. Because the created implant is semi-solid, it is paramount to handle it delicately to avoid breaking the molded cartilage implant. Moreover, it is critical to elevate the flap sufficiently not to scatter when placed in the nasal dorsum. Sufficient dissection and retraction of the elevated flap are needed when the implant is inserted to prevent graft deforming.

ALAR BASE RESECTION

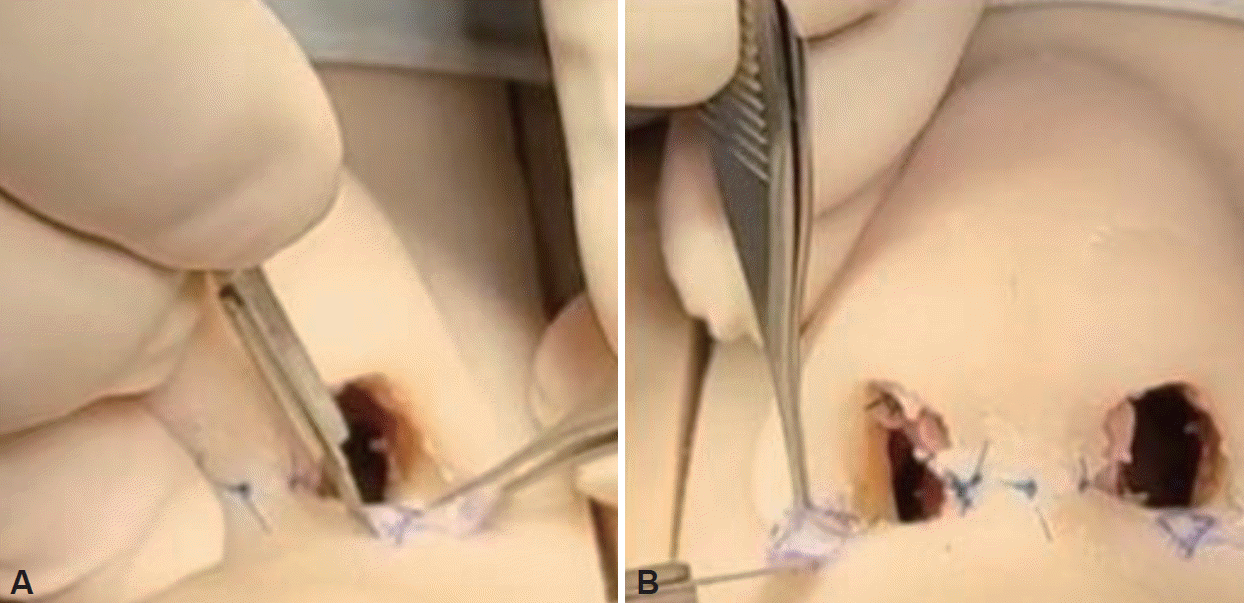
To reduce the width of the alar base, the nostril sill and the tissue inside the nostril are excised (nostril sill excision) (Fig. 10A). A 2.5–3.5 mm wide inverted trapezoid is drawn for nostril sill excision, and the design is similar to wedge excision. The sill and vestibular component are closed using 6-0 nylon. For an alar wedge excision, the line of excision is drawn using a caliper, which accuracy of 2.5–4 mm average) with quantitative variance on the two sides to correct asymmetries. With the area stabilized using a single skin hook, wedge excision is performed using the #15 blade. Following hemostasis, the edges are closed using 6-0 nylon (Fig. 10B).
Combined sill and alar resection is performed to simultaneously reduce the width of the alar base and correct alar flaring. Design the resection to maintain symmetry without excessive resection. First, an incision is made from the nostril floor toward the nostril sill. The alar incision is made 1–2 mm above the alar facial groove. The alar incision and nostril sill incision are connected. Resect along the incision of the alar and nostril floors. At this time, the alar should be excised obliquely in a wedge shape. In particular, the soft tissue in the area where the alar connects to the nostril should be left behind. The nostril sill is sutured first with a 6-0 nylon, followed by the alar, nostril sill, and nostril floor, in that order.

PCL MESH IN RHINOSEPTOPLASTY

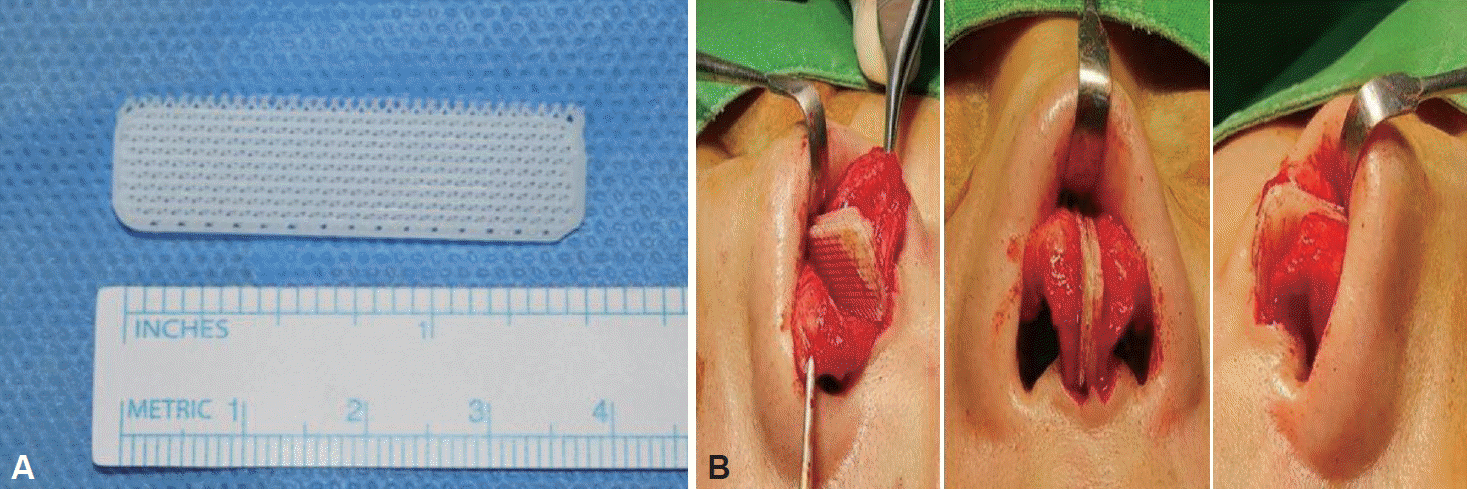
PCL implants have high biocompatibility with adequate mechanical strength and durability, and they are polymers that biodegrade slowly over two years (Fig. 11A). PCL is an appropriate material for application as a scaffold or implant because it can be melted at low temperatures without the need for dissolution in toxic solvents. Recently, this technique has been widely used in tissue engineering and rhinoseptoplasty [27].
The PCL mesh can be designed to have a shape similar to SEG and combined with SEG made by the septal cartilage. The prepared cartilage graft and the PCL graft are inserted into the mucoperichondrial pocket of the septum and fixed to the septum with 5-0 PDS sutures at 3 or 4 points bilaterally (Fig. 11B). The PCL mesh can provide additional support to the nasal tip and help prevent tip drooping postoperatively. However, there are some drawbacks to the PCL mesh, such as tip stiffness, inflammation, decreased tip projection, and implant extrusion. Moreover, to prevent inflammation, care should be taken to avoid tearing the septal mucosa and the consequent exposure of the PCL implant. The PCL mesh can be used in various ways, including SEG and spreader graft, sutured with autologous cartilage or bone [28].

CONCLUSION

The simulator model for rhinoseptoplasty has the potential to improve surgical outcomes in a safe and clean environment. This provides opportunities for training in a procedure that requires knowledge and precise judgment in rhinoseptoplasty. In addition, step-wise guidance can enhance their understanding and ability to perform safe and predictable surgical techniques with consistent results. Furthermore, it will also incite beginners’ enthusiasm to challenge the numerous procedures and broaden their skills for rhinoseptoplasty.

Notes

Ethics Statement

Ethical approval and informed consents does not apply to this article.

Availability of Data and Material

All data generated or analyzed during the study are included in this published article.

Conflicts of Interest

The authors have no potential conflicts of interest to disclose.

Author Contributions

Conceptualization: Ki-Il Lee, Tae-Bin Won, Seung-No Hong, Ji Sun Kim, Soo Whan Kim. Data curation: Ki-Il Lee, Tae-Bin Won, Sangmin Hyun, Hyungmin Song, Yong Ju Jang, Ji Yun Choi, Ji Sun Kim. Formal analysis: Ki-Il Lee, Ji Sun Kim. Funding acquisition: Tae-Bin Won, Soo Whan Kim. Investigation: Ki-Il Lee, Tae-Bin Won, Sangmin Hyun, Hyungmin Song, Yong Ju Jang, Ji Yun Choi, Ji Sun Kim. Methodology: Ki-Il Lee, Ji Sun Kim. Project administration: Tae-Bin Won, Seung-No Hong, Hyo Yeol Kim, Soo Whan Kim. Resources: Ki-Il Lee, Ji Sun Kim. Software: Ki-Il Lee, Ji Sun Kim. Supervision: Tae-Bin Won, Yong Ju Jang, Ji Yun Choi, Seung-No Hong, Hyo Yeol Kim, Soo Whan Kim. Validation: Ki-Il Lee, Tae-Bin Won, Seung-No Hong, Ji Sun Kim. Visualization: Ki-Il Lee, Ji Sun Kim. Writing—original draft: Ki-Il Lee, Ji Sun Kim. Writing—review & editing: Ki-Il Lee, Ji Sun Kim.

Funding Statement

None

ACKNOWLEDGMENTS

This work was presented during the hands-on course on rhinoseptoplasty at the Annual Congress of the Korean Academy of Facial Plastic and Reconstructive Surgery 2021. The authors thank all the tutors and participants in the hands-on course. Specially, we thank Dr. Yong Gi Jung, Dr. Ho Chan Kim, and Dr. Jong-Sook Yi for honorable photos and videos in this work.

REFERENCES

1. Jang YJ. Rhinoseptoplasty. 2nd ed. Seoul: Koonja;2013. p. 115.
2. Jones N. The nose and paranasal sinuses physiology and anatomy. Adv Drug Deliv Rev. 2001; 51(1-3):5–19.
crossref
3. Neves JC, Zholtikov V, Cakir B, Coşkun E, Arancibia-Tagle D. Rhinoplasty dissection planes (subcutaneous, sub-SMAS, supra-perichondral, and sub-perichondral) and soft tissues management. Facial Plast Surg. 2021; 37(1):2–11.
crossref
4. Jin HR. Korean rhinoplasty: surgical techniques and case illustration. 1st ed. Seoul: Ilchogak;2013. p. 72.
5. Jeong J, Terence G, Kim J. Understanding the anatomy of the transverse nasalis aponeurotic fibers and its importance in Asian rhinoplasty. Ann Plast Surg. 2018; 81(5):516–22.
crossref
6. Rohrich RJ, Dauwe PB, Pulikkottil BJ, Pezeshk RA. The importance of the anterior septal angle in the open dorsal approach to rhinoplasty. Plast Reconstr Surg. 2017; 139(3):604–12.
crossref
7. Kim JS, Khan NA, Song HM, Jang YJ. Intraoperative measurements of harvestable septal cartilage in rhinoplasty. Ann Plast Surg. 2010; 65(6):519–23.
crossref
8. Locketz GD, Lozada KN, Becker DG. Osteotomies-when, why, and how? Facial Plast Surg. 2020; 36(1):57–65.
crossref
9. Gerecci D, Perkins SW. The use of spreader grafts or spreader flaps-or not-in hump reduction rhinoplasty. Facial Plast Surg. 2019; 35(5):467–75.
crossref
10. Pereira Nunes D, Tinoco C, Oliveira E Carmo D, Paço J. Intermediate osteotomies in rhinoplasty: a new perspective. Eur Arch Otorhinolaryngol. 2017; 274(7):2953–8.
crossref
11. Farrior RT. The osteotomy in rhinoplasty. Laryngoscope. 1978; 88(9 Pt 1):1449–59.
crossref
12. Jang YJ, Wang JH, Sinha V, Lee BJ. Percutaneous root osteotomy for correction of the deviated nose. Am J Rhinol. 2007; 21(4):515–9.
crossref
13. VanKoevering KK, Rosko AJ, Moyer JS. Osteotomies demystified. Facial Plast Surg Clin North Am. 2017; 25(2):201–10.
crossref
14. Jang TY, Choi YS, Jung YG, Kim KT, Kim KS, Choi JS. Effect of nasal tip surgery on asian noses using the transdomal suture technique. Aesthetic Plast Surg. 2007; 31(2):174–8.
crossref
15. Guyuron B. Dynamics in rhinoplasty. Plast Reconstr Surg. 2000; 105(6):2257–9.
crossref
16. Pasinato R, Mocelin M, Berger CA. Nose tip refinement using interdomal suture in caucasian nose. Int Arch Otorhinolaryngol. 2012; 16(3):391–5.
crossref
17. Jin HR, Won TB. Nasal tip augmentation in Asians using autogenous cartilage. Otolaryngol Head Neck Surg. 2009; 140(4):526–30.
crossref
18. Jang YJ, Kim SH. Tip Grafting for the Asian nose. Facial Plast Surg Clin North Am. 2018; 26(3):343–56.
crossref
19. Jang YJ, Min JY, Lau BC. A multilayer cartilaginous tip-grafting technique for improved nasal tip refinement in Asian rhinoplasty. Otolaryngol Head Neck Surg. 2011; 145(2):217–22.
crossref
20. Johnson JB. Spreader-graft fixation. Plast Reconstr Surg. 1989; 84(3):540–1.
crossref
21. Cingi C, Bayar Muluk N, Winkler A, Thomas JR. Nasal tip grafts. J Craniofac Surg. 2018; 29(7):1914–21.
crossref
22. Kim JH, Song JW, Park SW, Oh WS, Lee JH. Effective septal extension graft for asian rhinoplasty. Arch Plast Surg. 2014; 41(1):3–11.
crossref
23. Na HG, Jang YJ. Dorsal augmentation using alloplastic implants. Facial Plast Surg. 2017; 33(2):189–94.
crossref
24. Kim IS. Augmentation rhinoplasty using silicone implants. Facial Plast Surg Clin North Am. 2018; 26(3):285–93.
crossref
25. Ledo TO, Ramos HHA, Buba CM, Webster G, de Lima JT Jr, de Paiva DL, et al. Outcome of free diced cartilage grafts in rhinoplasty: a systematic review. Facial Plast Surg. 2021; 37(1):117–21.
crossref
26. Tasman AJ. Dorsal augmentation-diced cartilage techniques: the diced cartilage glue graft. Facial Plast Surg. 2017; 33(2):179–88.
crossref
27. Kim DH, Yun WS, Shim JH, Park KH, Choi D, Park MI, et al. Clinical application of 3-dimensional printing technology for patients with nasal septal deformities: a multicenter study. JAMA Otolaryngol Head Neck Surg. 2018; 144(12):1145–52.
crossref
28. Kim SH, Choi JY. Surgical outcomes and complications of septal extension graft supported by 3D printed polycaprolactone plate. Laryngoscope. 2020; 130(7):1680–5.
crossref

Fig. 1.
Demonstrative photos of a silicone nose model (Simulare Medical Corp., Ontario, Canada). A: Frontal view. B: Lateral view. C: Separated view between a facial part for the support and a nasal part for the operation. D: Posterior view.
jr-2021-00390f1.tif
Fig. 2.
Demonstrative photos of incision using a silicone nose model. A: Marking for inverted V incision. B: Mid-columellar incision. C: Marginal incision along the caudal margin of lower lateral cartilage. D: Lateral columellar incision connected with previous marginal incision and mid-columellar incision.
jr-2021-00390f2.tif
Fig. 3.
Demonstrative photos of flap elevation and septal cartilage harvest using a silicone nose model. A: Supraperichondrial dissection. B: Subperiosteal dissection. C: Dissection of the membranous septum. D: Endoscopic view of septal cartilage harvest using a 0-degree rigid telescope.
jr-2021-00390f3.tif
Fig. 4.
Demonstrative photos of humpectomy using a silicone nose model. A: Design of osteotomy. B: En-bloc resection of a cartilaginous and bony hump. C: Rasping. D: Division of upper lateral cartilage and nasal septum.
jr-2021-00390f4.tif
Fig. 5.
Demonstrative photos of medial and lateral osteotomy using a silicone nose model. A: Medial osteotomy. B: Intra-nasal view of lateral osteotomy using a 0-degree rigid telescope. C: Outside view of the lateral osteotomy. D: Outside view of percutaneous osteotomy using 2 mm osteotome.
jr-2021-00390f5.tif
Fig. 6.
Demonstrative photos of suture technique using a silicone nose model. A: Transdomal suture. B: Interdomal suture.
jr-2021-00390f6.tif
Fig. 7.
Demonstrative photos of cartilage grafting using a silicone nose model. A: Onlay graft. B: Shield graft. C: Spreader graft. D: Columellar strut. E: Septal extension graft (caudal septal extension type). F: Septal extension graft (extended spreader type).
jr-2021-00390f7.tif
Fig. 8.
Representative photos of dorsal augmentation with a silicone implant. A: Carving of a silicone implant. B: Insertion of a silicone implant into a dorsal pocket.
jr-2021-00390f8.tif
Fig. 9.
Demonstrative photos of dorsal augmentation with diced cartilage. A: Dicing of cartilage. B: Molding with tissue glue using a commercially available mold (Jang Cartilage Mold, Nextcore Co., Ltd., Ulsan, Republic of Korea).
jr-2021-00390f9.tif
Fig. 10.
Demonstrative photos of alar base resection. A: Nostril sill excision. B: Alar wedge resection.
jr-2021-00390f10.tif
Fig. 11.
Representative photos of PCL mesh. A: Demonstrative picture. B: Surgical view of the septal extension graft combined with PCL mesh bilaterally (From Kim, et al. Laryngoscope 2020;130(7):1680-5 [28]., with permission of Wiley). PCL, polycarprolactone.
jr-2021-00390f11.tif
TOOLS
Similar articles