

 PDF
PDF ePub
ePub Citation
 Print
Print


INTRODUCTION
Pedicle screw fixation is a necessary part of various spinal surgeries. Despite many advantages of using pedicle screws, their usage in the spine is replete with danger and has the potential for permanent neurologic deficit especially when placing screws near the spinal cord at the concave apex of a scoliotic thoracic spine4,9,10,14). There are several methods of pedicle screw placement that have been developed to enhance the safety of its usage. Some surgeons first identify anatomical landmarks by intraoperative C-arm image intensifier or K-wires placement into the pedicles8,15). It is time consuming to take C-arm images after each pedicle screw placement and to rearrange the drapes each time an image is taken. Others utilize stereotactic image guided systems that are based on preoperative computerized tomographic (CT) scan or fluoroscopy1,5,13). The stereotactic image guided systems requires preoperative CT scan with exposure to high levels of radiation, higher cost, the need for expensive equipment, and prolonged operation time.
Although these techniques slightly increase placement accuracy, they are also associated with increased radiation exposure to the patient and surgeon as well as increased operative time. In the present study, we describe our experience with the placement of pedicle screws in the thoracic spine using a free hand technique without any radiographic guidance. Moreover, we conducted a cadaveric study to evaluate the accuracy and safety of this technique.
Go to : 
MATERIALS AND METHODS
Two thoracic spine cadaver specimens were assigned to test the accuracy of this free hand technique for transpedicular screw fixation. The accuracy of transpedicular screws was confirmed using intraoperative C-arm images and naked eye examination. To objectively evaluate the position of the screws inserted, postoperative computed axial tomography (CAT) scans were performed. The relative position of the screw inside the pedicle by the CAT scan was graded as follows : 1) contained : axis of the pedicle screw is between the medial and lateral pedicle walls completely; 2) medial violation : axis of the pedicle screw is out of medial wall of the pedicle; and 3) lateral violation : axis of the pedicle screw is out of the lateral pedicle walls. The positions of the scanned pedicle screws were determined by two senior spine surgeons.
Surgical technique
Free hand pedicle screw placement is performed using anatomic landmarks. The surgical technique of free hand transpedicular screw placement can be broken down into specific steps that are repeated at each level.
Incision and exposure
The first important component of successful thoracic screw placement is meticulous exposure of the posterior elements. The spine is exposed to the tips of the transverse processes bilaterally and to the lateral border of the superior articular process (SAP), staying strictly subperiosteal to reduce bleeding. The facet joints must be thoroughly cleaned of soft tissue (Fig. 1). The inferior facets are removed with a 0.5-inch straight osteotome (down to T10) or rongeur (below T10).
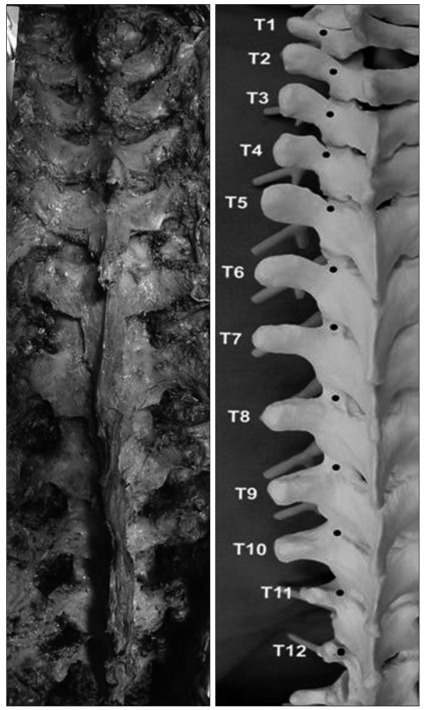 | Fig. 1Complete exposure and facetectomy : the posterior elements of the spine to the edge of the transverse processes are exposed bilaterally. The inferior facets are removed with a straight osteotome (down to T10) or rongeur (below T10). There is a trend towards a more medial and cephalad (proximal) starting point on the posterior elements as one proceeds to the apical midthoracic region (T7-T9).
|
The cortical burring of starting point
The starting point of the T1-T3 and T12 vertebra is at the junction of the bisected transverse process and lamina at the lateral border of the pars. There is a trend towards a more medial and cephalad (proximal) starting point on the posterior elements as one proceeds to the apical midthoracic region (T7-T9) level by level (Fig. 1). The starting point of the apical midthoracic region (T7-T9) is the most medially proximally located, at the junction of the proximal edge of the transverse process and just lateral to the mid portion of the base of the SAP (usually just 2-3 mm medial to the lateral border of the pars). Above the midthoracic region, the starting point tends to move slightly lateral and caudad as one proceeds more proximal in the thoracic region. The starting point of the T4, T5, and T11 is at the junction of the proximal one third of the transverse process and lamina just medial to the lateral border of the pars. Lastly, the starting point of the T6 and T10 is at the junction of the upper laminar ridge and lamina just medial to the lateral border of the pars. It is advantageous to note these trends when placing a screw at each level in succession, working from distal to proximal in the thoracic spine, to make fine adjustments to the trajectory of the next screw base on the previous level screw or contralateral screw. A 3 mm cutting burr is utilized to create posterior cortical breach, approximately 5 mm in depth.
Gearshift probing
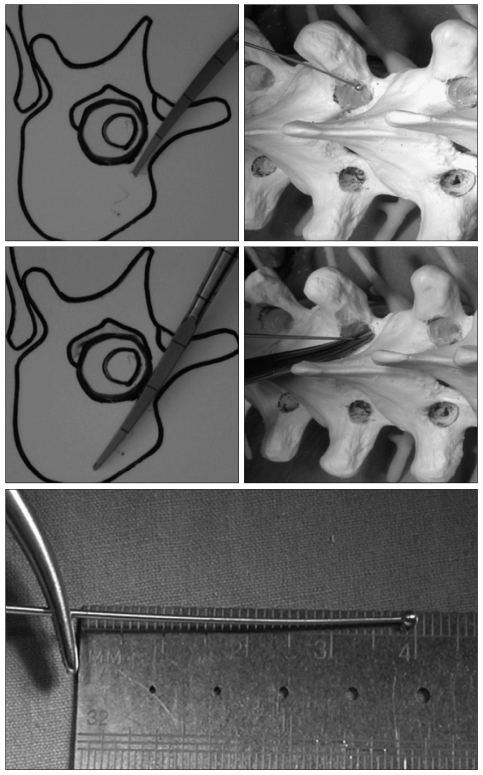
The gearshift is initially pointed lateral as a safety measure to avoid medial wall perforation (Fig. 2). Gearshift was advanced from the desired starting point toward the center of the isthmic part. After inserting the gearshift tip approximately 15-20 mm (to beyond the isthmic part of the pedicle), the gearshift is removed and confirmed 5 bony walls through ball-tip. Then, the tip of the gearshift turned to face medial. The pedicle finder is advanced with an ultimate depth averaging 25-40 mm in the thoracic spine. It is important to make sure that surgeon to feel the bone of entire length of the pedicle and body.
Palpation and pedicle length measurement
Once the pedicle seeker is removed, the tract is visualized. A flexible ball-tipped pedicle sounding or palpating device is utilized to palpate five distinct bony borders : a floor and four walls (medial, lateral, superior and inferior). At this point, if a soft tissue breach is palpated, there may be an opportunity to redirect the screw into an appropriate position into the pedicle. If any wall including the medial has been breached, the pedicle may be salvageable. Otherwise, we place bone wax in the pedicle hole to eliminate the bleeding and re-angle the pedicle finder with a more appropriate trajectory.
Tapping, repalpation and screw placement
The pedicle tract is undertapped with a 1 mm less diameter tap than the intended screw. Following this, the pedicle tract is palpated again to make sure that the five osseous borders are intact. This second palpation will often allow palpation of distinct bony ridges confirming intraosseous position and the tract length is remeasured with a hemostat. This measurement is compared directly adjacent to the screw to be placed to ensure appropriate screw length. Next, the screw is placed slowly down the pedicle into the body in the same alignment to confirm it is threaded properly and allow for viscoelastic expansion.
Confirmation of intraosseous screw
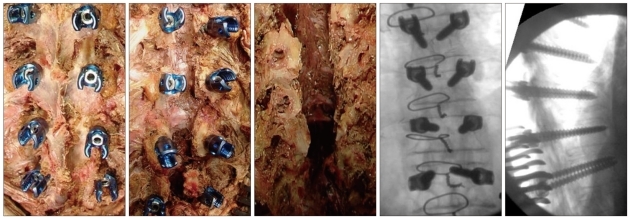
It is imperative that the surgeon document intraosseous placement via fluoroscopy and/or radiography. The coronal plane radiograph is evaluated for the harmonious position of all screws especially when any rotational scoliosis deformity exists. In cases of shorter or longer screws compared to adjacent screws, the screw length as viewed on the lateral X-ray is mandatory to check for harmonious position. On the lateral X-ray, the screws should be parallel to the superior endplates, and not extending past the anterior border of the vertebral body. These two plane radiographs should confirm the harmonious position of the screws (Fig. 3, 4).

Go to :
RESULTS
A total of 48 thoracic pedicle screws were inserted in two cadavers. The diameter of the screws used in the thoracic spine ranged from 4.5 to 7.5 mm. The number of the screws inserted were as follows (total n=48). The levels operated were T1-T6 (24) and T7-T12 (24). All 48 transpedicular screws inserted into the thoracic spine were all evaluated by C-arm, naked eye examination and CAT scan to assess for screw position (Fig. 4). Among 48 pedicle screws inserted, thoracic pedicle screws were accurately placed in 97.9% (47 of 48). Only one screw (2.1%) showed medial cortical perforation which meant the central line of the pedicle screw was out of the medial cortex of the pedicle wall (Fig. 5).
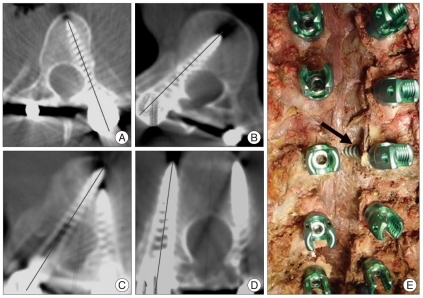 | Fig. 5Accuracy evaluation using computed tomographic (CT) scans. Definition of acceptable screws : axis of the pedicle screw between the medial and lateral pedicle walls (A and B). CT scan demonstrates the medial (C) and lateral (D) cortical breach. E : Arrow indicates the medially violated screw by naked eye examination.
|
Go to :
DISCUSSION
Pedicle screw fixation has the advantage of purchase of all three spinal columns without encroaching into the spinal canal3). This theoretical advantage has been translated to superior clinical results in fracture fixation as well as in deformity correction7,9-11,14,15). However, their usage in the spine has the potential for permanent neurologic deficit, especially when placing screws near the spinal cord at the concave apex of a scoliotic spine2,4,9,12,16). The safety margin for this technique has been improved through the use of image-guided techniques1,5,13). Nevertheless, these newer techniques require additional equipment as well as the use of fluoroscopy which increases the radiation exposure.
Some surgeons identify anatomical landmarks by K-wires placement into the pedicles. The incidence of pedicle screw misplacement ranges from 1.5% to 25% using the K-wire guided methods2,10,15). Although previous research showed only 1.5% misplacement, they admitted that the actual rate would be higher as their patients were primarily evaluated by the postoperative radiographs15). Conventional K-wire guide technique could not allow direct visualization of the starting point on the intraoperative fluoroscopy and/or radiography. In the present study, only one pedicle screw of 48 (2.1%) demonstrated violations (1 medial violation in cadaver), even after the postoperative CT scan evaluation of all pedicle screws enrolled.
Recently, the free hand technique has gained popularity. One of the authors reported a series in which 3400 screws had been placed by the free hand technique without neurovascular complications, and only 6% had moderate breaches6,7). Although their experience demonstrates that pedicle screws can be consistently placed in an accurate fashion using the described free hand method, it is important that each surgeon use whatever assistive device or technique that surgeon may require to accurately place pedicle screws.
Go to :
CONCLUSION
The placement of thoracic pedicle screw using the free hand technique without any radiographic guidance appears to be an accurate, reliable, and safe method of insertion without more radiation or time consuming. Nevertheless, before using this technique, surgeon must have a thorough knowledge of vertebral anatomy, follow and use diligent and repetitive confirmatory steps to compulsively assure intraosseous placement.
Go to :
 XML Download