Introduction
As the range of application of implant prostheses is expanding and the success rate is increasing, functional and aesthetic demands for restoration are diversifying. In fulfilling those demands, stock abutments have limitations such as the need for revision of the abutment shape, the deterioration of retention, the unnatural emergence profile and the risk of overfilling of the final prosthesis. Therefore, customized abutment is actively utilized.
1 Advantages of the CAD/CAM abutment include the implementation of an optimized emergence profile, reduction of the risk of fracture of the final prosthesis by adjusting the thickness of the abutment upper prosthesis, freedom of margin positioning and ease of removal of excess cement.
2
In particular, it is known that the use of a customized abutment is an essential choice when the interocclusal space is insufficient; the implant needs to be angled more than 15°; when a collar height greater than 1 mm above the collar height of the stock abutment is required, parallelism is needed to achieve more than 3 unit restorations, or optimal soft tissue contours are required.
3,
4 In these cases, it is important that the abutment needs to be designed sophisticatedly as possible, and the designed values should be accurately embodied in the output CAD software.
In this study, we evaluated two recent CAD software programs for comparing their reproducibility of the customized abutment designed for various clinical conditions.
Go to :

Materials and Methods
1. Working model
We used a working model in which an internal type implants (GS type, Osstem, Seoul, Korea) were implanted in the right maxillary first premolar, the right maxillary canine, the left mandibular first molar and the left mandibular central incisor. After placing the small size fixtures in the anterior and the regular size fixtures in the posterior regions, surrounding gingival shape was made by using a vinyl polysiloxane impression material (Examixfine, GC, Tokyo, Japan) (
Fig. 1).
 | Fig. 1Working model. (A) Maxilla, (B) Mandible. 
|
Using the data obtained by scanning (FREEDOM HD, DOF, Seoul, Korea) the working cast, customized abutments were designed for the right maxillary first premolar, right maxillary canine, left mandibular first molar and left mandibular incisors by using 3Shape Dental System CAD software (3Shape Dental System, Copenhagen, Denmark) and Delta9 CAD software (Delta9, Daesung, Seoul, Korea). In order to minimize deviation of the design of each specimen, two experimenters were assigned to each CAD software program. The CAD design of each abutment was named CAD-reference-model (CRM) and saved as a stereolithography (STL) file.
In this study, the design options are consists of three categories; axial wall angle, margin radius, antirotation form. Each options were applied to the custom abutment for 4 regions; mandibular incisor (T31), maxillary canine (T13), maxillary premolar (T15) and mandibular molar (T36).
Firstly, the inclinations of the abutment’s upper portion (from margin to the top). The axial wall angles were divided into three groups of 2°, 4° and 6° recommended for clinical applications and named A
2 (Angle2°), A
4 (Angle4°) and A
6 (Angle6°).
5-
10 Secondly, the margin radius. The margin radius was divided into two groups of 0.6 mm and 0.9 mm. These two groups were named R
6 (radius 0.6 mm) and R
9 (radius 0.9 mm), respectively.
11,
12 The marginal curvature increases the margin width as the value increases. It is necessary to minimize the increase in the margin width in order to minimize the horizontal movement of the crowns due to the lateral force during mastication. That is why the minimum margin radius is 0.6 mm which can be obtained when milled with the diameter 1.0 mm milling bur used in the laboratory. The last category is the anti-rotation form. It was divided into two groups: the set group (Y) and the unset group (N). Twelve specimens were designed for each tooth with different set values (axial wall angle, margin radius, anti-rotation form) for all 4 restorations. The designed specimens were labeled TxAyRzY or TxAyRzN. In this paper, we designed 96 abutments for 48 scenarios, using both the Delta9 and 3Shape Dental System (
Table 1).
Table 1
|
Option items |
Tooth No. (Tooth, Tx) |
Axial wall angle (Angle, Ay) |
Margin radius (Radius, Rz) |
Anti-rotation form Y/N |
|
x, y, z |
31 (T31)
13 (T13)
15 (T15)
36 (T36) |
2° (A2)
4° (A4)
6° (A6) |
0.6 mm (R6)
0.9 mm (R9) |
Yes (Y)
No (N) |

2. Data capturing & processing
The 5-axis milling machine (ARUM 5x-100, Doowon Inc., Daegeon, Korea) was used to mill the designed abutments with 1 set of 1.0 mm diameter milling burs per specimen. Then, we scanned the top of the output abutment with a contact method scanner (DS10, Renishaw, Gloucestershire, UK). Renishaw uses a probe to touch the object directly. It mechanically recognizes the shape line-by-line and obtains the information by converting the position value given by the ball and the coordinate values given by the three axes. In this way, the three-dimensional structure can be measured.
13
In this study, we used a contact method scanner to reduce the thickness error due to the use of powder during scanning and to obtain the most accurate image. The contact type scanner used in the experiment scans the entire surface of the abutment by raising a ruby ball with a radius of 0.5 mm at the speed of 200 μm per turn, which draws a spiral curve up the object from the bottom of the abutment fixed on the vertical support of the scanner. We performed error analysis after removing unnecessary parts of the scanned data by using a 3-dimensional (3D) analysis program (Geomagic Control X, 3D Systems, USA).
14
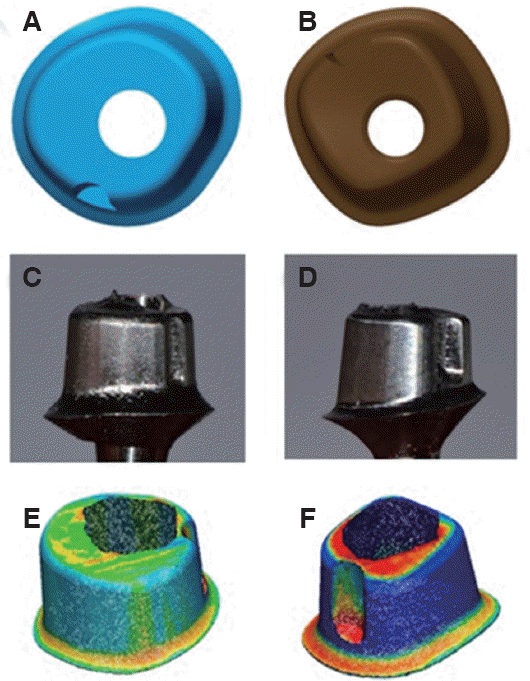
The CRM STL file of each abutment was set as the control group, and the test STL file after the milling was designated as the comparative group. After initial alignment of each Test STL file with the CRM STL file of the same name, the Test STL file was converted into point clod data and rearranged into the surface data, CRM STL file, to achieve the best fit alignment. The point cloud was placed on the surface of the CRM STL file data, respectively. The distance between the surface data and all the corresponding points was converted into the root mean square (RMS) value to obtain the error average (
Fig. 2). mandibular molar (T36) were designed having 4° axial wall, 0.9 mm margin radius and anti-rotation form (CRM STL file: Delta9 (A), 3Shape Dental System (B)). Millin g process was done in accordance with CRM STL files (Delta9 (C), 3Shape Dental System (D)). C and D were scanned by using contact type scanner and the scanned data (Test STL file) were overlaid with each CRM STL file to do 3D analysis (Delta9 (E), 3Shape Dental System (F)).
 | Fig. 2T36A4R9Y. Custom abutments for the left mandibular molar (T36) were designed having 4° axial wall, 0.9 mm margin radius and anti-rotation form (CRM STL file: Delta9 (A), 3Shape Dental System (B)). Millin g process was done in accordance with CRM STL files (Delta9 (C), 3Shape Dental System (D)). C and D were scanned by using contact type scanner and the scanned data (Test STL file) were overlaid with each CRM STL file to do 3D analysis (Delta9 (E), 3Shape Dental System (F)). 
|
In addition, we compared the differences in specific regions by performing local scoping separately to investigate the partial error range in three areas of the axial wall, the margin, and the anti-rotation form.
We used RMS to check the error range. RMS is an average value mainly used for measurement error values in which both positive and negative values coexist, and the following formula was used:
15
n is the total number of specimens. X
1,i are the measuring points of the control group, and X
2,i are the measurement points of the experimental group. In this study, the error was evaluated by using the RMS value. According to International Organization Standard 12836, the lower the RMS value, the better the accuracy.
16
In this study, abutment whole-body superposition and abutment partial region superposition were performed separately according to the design conditions by using the above-mentioned method. The milling reproducibility of the two CAD software programs was evaluated by comparing the measured milling error values.
3. Statistical analysis
All three-dimensional measurement data generated by superimposing CRM STL data and corresponding test STL data was analyzed using IBM SPSS Statistics 24 (SPSS, IBM Corp., Armonk, USA). The Mann-Whitney U test was performed to compare differences in anti-rotation form formation and margin curvature in each CAD software program. The Kruskal-Wallis test was performed to evaluate the difference over the upper abutment angle. Post analysis was performed through pairwise comparisons. The statistical significance level was set at 0.05.
Go to :

Results
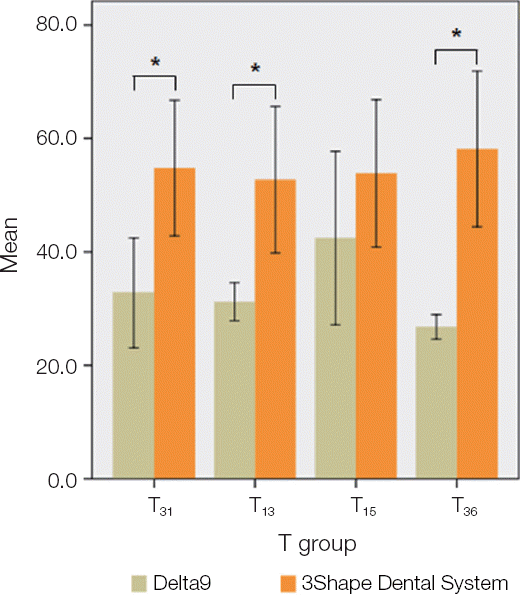
When superimposing the whole-body scan of specimens (from the margin to the top), CRM STL file and Test STL file, Delta9 showed better milling reproducibility in T
31, T
13 and T
36 groups than that of 3Shape (
Fig. 3) (
P < .05). The main effect of tooth diameter were F = 0.607,
P = .613, indicating that the T group and milling error were not significant for each CAD system. The main effect of the CAD software was F = 35.698,
P = .000, and there was a significant difference between the two CAD software programs for milling error. The interaction effect was F = 1.279,
P = .288, and there was no significant difference between the T groups by the type of CAD software (
P = .288).
 | Fig. 3Three dimensional error value of the abutments between the two CAD software programs (unit-μm). 
|
When the axial milling error was compared according to A group, Delta9 had smaller error value in all cases. Taking a detailed look at T groups, T
31 showed a significant difference between the two CAD software programs for the entire A group, and the T
13 group showed a significant difference in A
2 and A
6, while the T
36 group had significant difference only for the A
6 group (
Table 2A).
Table 2
Milling error values according to each design condition
|
(A) Angle of the axial wall |
|
|
Group System Tooth |
Delta9 Mean±SD |
A2 3ShapeDental System Mean±SD |
P
|
Delta9 Mean±SD |
A4 3ShapeDental System Mean±SD |
P
|
Delta9 Mean±SD |
A6 3ShapeDental System Mean±SD |
P
|
|
T31
|
7.1±0.8 |
64.3±23.1 |
.029*
|
9.2±3.7 |
26.1±7.0 |
.029*
|
7.5±2.1 |
48.7±11.2 |
.029*
|
|
T13
|
17.7±4.8 |
67.4±19.4 |
.029*
|
11.5±4.0 |
14.3±3.8 |
.343 |
12.3±1.1 |
38.1±13.9 |
.029*
|
|
T15
|
39.1±11.6 |
43.6±14.0 |
.686 |
24.2±7.7 |
36.8±12.1 |
.114 |
29.9±18.2 |
35.6±3.2 |
.343 |
|
T36
|
27.7±2.4 |
27.7±3.3 |
.886 |
13.5±1.7 |
33.5±22.4 |
.057 |
14.7±4.3 |
45.5±10.9 |
.029*
|
|
|
(B) Margin radius
|
|
|
Group System Tooth
|
Delta9 Mean±SD
|
R6 3Shape DentalSystem Mean±SD
|
P
|
Delta9 Mean±SD
|
R9 3Shape DentalSystem Mean±SD
|
P
|
|
|
T31
|
20.2±4.1 |
28.5±8.9 |
.132 |
13.8±2.6 |
23.6±8.6 |
.026*
|
|
T13
|
21.9±3.0 |
33.3±2.8 |
.002*
|
15.2±5.8 |
26.3±5.0 |
.004*
|
|
T15
|
26.1±10.6 |
35.2±5.2 |
.065 |
18.0±2.1 |
27.5±2.8 |
.002*
|
|
T36
|
18.8±2.3 |
33.1±1.9 |
.002*
|
13.4±1.7 |
22.3±4.9 |
.002*
|
|
Total |
21.7±6.3 |
32.5±5.7 |
.000*
|
15.1±3.7 |
24.9±5.7 |
.000*
|
|
|
(C) Anti-rotation form
|
|
|
Group System Tooth
|
Delta9 Mean±SD
|
A2 3ShapeDental System Mean±SD
|
P
|
Delta9 Mean±SD
|
A4 3ShapeDental System Mean±SD
|
P
|
Delta9 Mean±SD
|
A6 3ShapeDental System Mean±SD
|
P
|
|
|
T31
|
88.7±33.3 |
103.0±4.9 |
1.000 |
71.5±6.6 |
149.5±47.0 |
.333 |
80.7±9.8 |
111.6±3.8 |
.333 |
|
T13
|
76.4±10.8 |
118.6±0.7 |
.333 |
42.7±16.2 |
98.8±22.3 |
.333 |
82.8±5.1 |
65.1±1.6 |
.333 |
|
T15
|
73.2±15.6 |
123.6±3.0 |
.333 |
67.2±11.2 |
115.6±1.7 |
.333 |
69.3±9.8 |
119.3±19.2 |
.333 |
|
T36
|
81.8±13.6 |
98.2±4.0 |
.333 |
79.8±9.0 |
84.1±14.5 |
1.000 |
82.2±8.8 |
69.9±2.5 |
.333 |
|
|
(D) Cumulative error vales in each CAD system
|
|
|
Group System Tooth
|
Delta9 Mean±SD
|
A2 3ShapeDental System Mean±SD
|
P
|
Delta9 Mean±SD
|
A4 3ShapeDental System Mean±SD
|
P
|
Delta9 Mean±SD
|
A6 3ShapeDental System Mean±SD
|
P
|
|
|
Total |
Anti-rotation form |
80.0±16.6 |
110.8±11.6 |
.002*
|
65.3±17.1 |
112.0±33.1 |
.002*
|
78.7±8.8 |
91.5±26.9 |
.721 |
|
Axial |
22.9±13.5 |
50.7±22.4 |
.000*
|
14.6±7.3 |
27.6±14.9 |
.002*
|
16.1±12.1 |
42.0±10.9*
|
.000*
|
|
Margin |
20.8±8.9 |
32.4±3.3 |
.000*
|
17.6±3.4 |
28.3±5.5 |
.000*
|
16.9±4.0 |
25.4±8.8 |
.001*
|

In all cases, the mean milling in the margin region according to R group (margin radius) was smaller in 3Shape than that in the Delta9, but there was no significant difference between the T
31R
6 group and the T
15R
6 group (
P > .05) (
Table 2B). The mean error value was smaller in R
9 than in R
6.
The milling error in the form of anti-rotation did not show any significant difference between the two systems in all cases (
Table 2C).
Finally, all specimens were divided according to A group in each CAD software, and every error values in three regions (axial wall, margin, anti-rotation) were cumulated by parts (
Table 2D). The Delta9 showed better milling reproducibility at all most parts than 3Shape.
Go to :

Discussion
The object of this study was to verify the function of the two popular CAD software programs through evaluation of the milling reproducibility of the customized abutment designed by clinicians. For the Delta9, it showed a relatively smaller error value than that of 3Shape. However, it should be considered that this result came out from the limited and uncontrolled analysis conditions such as differences in margin width and anti-rotation shape and so on between the two CAD software programs. Errors in milling processes are not negligible as well.
Even though, in this study, it was supposed that the reproducibility of the output abutment is a representative value of that particular CAD software because the CAD software is programmed to satisfy the same design requirements of the experimenters as much as possible. That is why all output abutments can explain the performance of the CAD software to some extent.
To minimize error occurrence probability, several efforts were made in this study. Firstly, contact type scanner was chosen in scanning process, the touch probe has a good accuracy because it touches the object directly and acquires all the measurement points. On the other hand, since the touch probe must contact the surface of the object, it may deform or damage the object. In addition, it has a limited ability to measure sharp spikes due to the round shape of the touch probe.
17 However, Persson et al. reported that a touch probe is highly efficient. They compared the accuracy and stability of each scanner by using a dental contact method scanner and a non-contact laser scanner. Software was used to overlap the results and produce three-dimensional digital models of each abutment. In both scanners, small errors of less than 10 μm were observed. The contact type scanner was more accurate and stable, and in qualitative evaluation. Moreover, contact type was more efficient in reproducing the edge surface than the laser scanner when scanning edges such as the margin.
18
Secondly, to reduce processing errors occurring in estimating partial region-specific analysis, such as lacking consistency in setting partial regions (axial wall, margin, anti-rotation form), we also compared the error values of the whole upper part of the abutments. That could enhance the best fit alignment in the overlapping comparison. Delta9 from the wholebody scan was analyzed by T groups, which showed that better milling reproducibility can be obtained through the use of Delta9 software in real clinical practice (
Fig. 3).
In order to investigate the difference in error sensitivity between CAD software programs according to the partial design setting of the abutment, the error was divided into three parts: axial wall, margin, and anti-rotation form. When we compared the error values of the axial wall according to the A group except for T36A6, the smaller the implant diameter of the area to be restored, the more significant the difference between the two CAD software programs was. It is expected that the difference in the shape of output abutments from each system becomes more apparent as the diameter of the implant becomes smaller. Since the axial line angle of abutment using the 3Shape Dental System is smaller than the Delta9, this may result in accumulated errors during the milling process or during the contact process of the round tool used for rescans. In particular, when designing the anterior teeth and cusps using the 3Shape Dental System, more delicate work will be required considering the possibility of milling errors.
The axial wall milling error of the T15 group was not significantly different between the two systems under all conditions. Further research is needed to determine whether the effects of design, implant area, and height are offset and minimized when working on the premolar site. On the other hand, Delta9 software shows higher milling error values than other parts in all of the same axial wall angle conditions in the abutment design of the premolar region. It should be supplemented with further research on whether there is a site-specific error in the software programs.
As a result of the measurement of the milling reproducibility according to the marginal radius, the milling error of all CAD systems was smaller at R9 than at R6. This is because these gentle curves have the advantage of reducing the error in the scanning process by allowing the touch probe to more closely contact the implant. When a 0.9 mm margin radius was applied (R9), the 3Shape Dental System showed greater milling error in all T groups than that of Delta9 (P < .05). When the same margin curvature was applied, the curvature given by the 3Shape Dental System to the design might be different from that of the actual milling bur. It is not possible to exclude the possibility that the margin width is set wider than the Delta9 when designing using 3Shape Dental System software, which can increase the error value by providing more surfaces to be estimated. The Delta9 has an automatically set margin width through numerical input, while the 3Shape makes margin by manual drawing.
When the anti-rotation form was created, the milling error values were not significantly different between the two CAD systems in the all A groups. Even though, anti-rotation form has the highest absolute error value among all variables in this study, it seems not cause a significant difference in the total error of each specimen. For that reason, the formation of an anti-rotation form is clinically acceptable.
Considering many papers that show that the formation of the anti-rotation form is a necessary factor to improve the retention of the prosthesis and the error value in their studies is in a clinically acceptable range, the use of anti-form rotation design in the CAD software programs in this study can be considered acceptable. Sahu et al.
19 reported that they have achieved tensile bone strength of about 2.5 times higher than smooth surfaced milled abutments. In an evaluation of the factors affecting the retention of the standard titanium implant abutments of Eklinget et al.,
20 they noted that the retention increases with an increasing anti-rotation plane.
Finally, the errors of the abutments were integrated by the CAD system, and the milling errors of the three (axial wall, margin, anti-rotation form) CAD systems were further compared according to the A group (
Table 2D). In actual clinical practice (except in special circumstances), it is the axial wall angle that is the most frequently designated as the design setting value directly by the clinician. That is why we classified and compared the errors according to the A group to investigate the effect of axial wall angle on the milling error. Delta9 showed significantly better reproducibility regardless of axial wall angle, except in the A6 group.
In this study, there were uncontrolled factors during process, which might affect the result some to extend. It could be called as a limitation.
Firstly, since the design of the custom abutment was different due to the differences in the set range of the tools provided in each experimental CAD software program, it was not possible to make a through comparison of the milling error values between the two CAD software programs for each specimen. Therefore, we tried to interpret the data with a focus on qualitative analysis.
Secondly, the overall shape of the specific custom abutments of each CAD software program results in a difference in the total surface area, and the larger the area becomes, the greater the possibility that the error value increases.
Finally, the error values were presented by overlaps between the CRM STL file and the Test STL file, and the tendency was analyzed. These are unavoidable errors that were measured during the course of the experiment: errors in designing, milling bur wear, errors in generating STL file transformation, actual errors when nesting two STL files, as well as errors due to insecurity in array. The effect of these factors on the experimental results cannot be ruled out.
15,
21
Go to :


 PDF
PDF Citation
 Print
Print


 XML Download