

 PDF
PDF Citation
 Print
Print


Introduction
Cement retained implant restorations have several advantages over screw retained ones. First, it is easier to achieve passive fit. Second, they are more aesthetic and easier to apply occlusal force in longitudinal direction.1 It can be difficult to remove residual cement underneath the subgingival margin of restoration. However, excess cement causing periimplantitis should be removed.
Several cementation techniques using abutment replica have been introduced to remove excess cement, making it possible to properly retain restoration while minimizing residual cement.2 Materials such as polyvinyl siloxane impression, bite material, and acrylic resin have been used.3-5 Technique for fabricating replica with resin block using computer aided design/computer aided manufacturing (CAD/CAM) is also possible.6 However, these techniques are complicated. They require additional cost and equipment.
In this case report, a procedure to simply and quickly fabricate abutment replica at chairside is described.7 It uses hot melt adhesive material (HMA), a thermoplastic material consisting of ethylene vinyl acetate copolymer, wax, resins, pigment, and other components.8 Dentist can make a flexible model to fabricate temporary restorations using an electric glue gun.9 Because HMA has good flow, good strength, and good flexibility, it can be applied to narrow areas such as the incisal edge without causing fracture.
Go to : 
Case Report
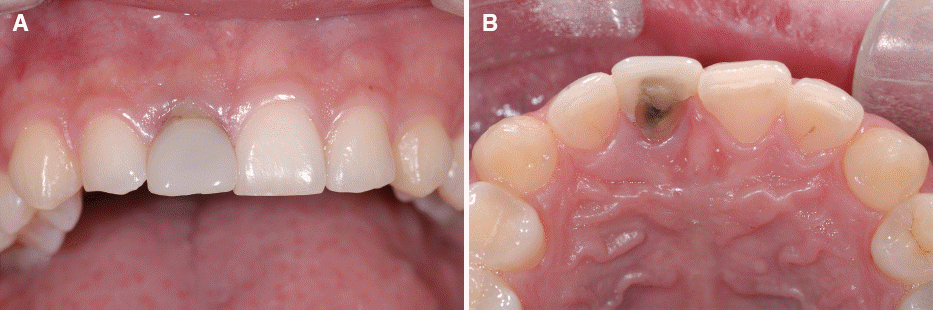
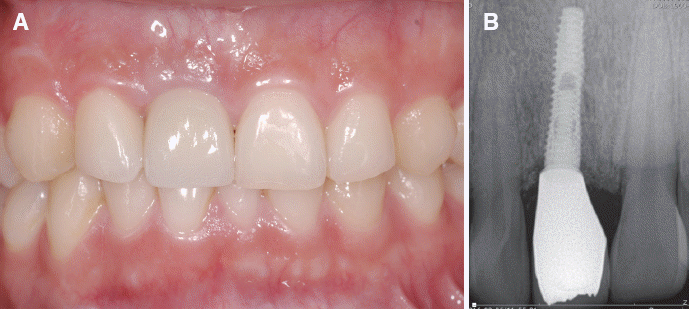
A 22-year-old male patient with discoloration and gingival recession of the maxillary right central incisor received endodontic treatment due to injury nine years ago. He presented at the Department of Prosthodontics, Chonbuk National University Hospital. Maxillary right central incisor showed grade II mobility (according to the Miller classification). The 5 mm of periodontal pocket depth was measured at distal surface. Half of his palatal surface of teeth was destroyed (Fig. 1). Cone-beam computed tomography (CBCT) was taken to evaluate bone height and width. Considering the age and sex of the patient, the tooth with poor prognosis was extracted and implant placement was determined.
After 3 months for tooth extraction, guided bone regeneration (GBR) was performed with xenograft material (Bio-Oss®, Geistlich, Wilhusen, Switzerland), titanium mesh (T4 Neo tatinium mesh, Neobiotec, Seoul, Korea), and collagen membrane (Genoss Co., Ltd., Suwon, Korea) to obtain wide alveolar bone. At 7 months post GBR surgery, implant fixture (Superline 3.6 × 12 mm, Dentium Co., Seoul, Korea) was placed. Good initial stability was observed. After 6 months, the second surgery was carried out. Since good osseointegration was observed, provisional restoration was connected with 20 Ncm. Interdental papilla was stably maintained for 3 months (Fig. 2). For duplicating the emergence profile of provisional restoration, custom impression coping was fabricated with pick-up type impression coping (DPU4011HL, Dentium Co., Seoul, Korea). Final impression was taken with polyvinyl siloxane (Aquasil XLV/Monophase, Dentsply Caulk, Milford, USA). Working cast was fabricated with type IV dental stone (Fuijirock EP, GC, Tokyo, Japan). Zirconia custom abutment with titanium insert (RaphaBio, Seoul, Korea) and veneered zirconia restoration was fabricated with CAD/CAM.
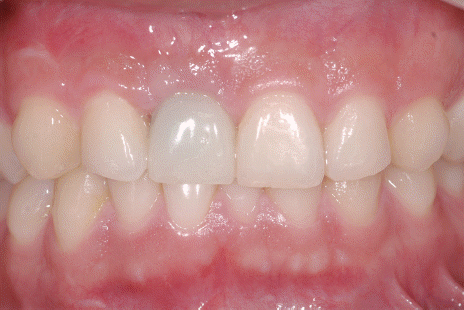
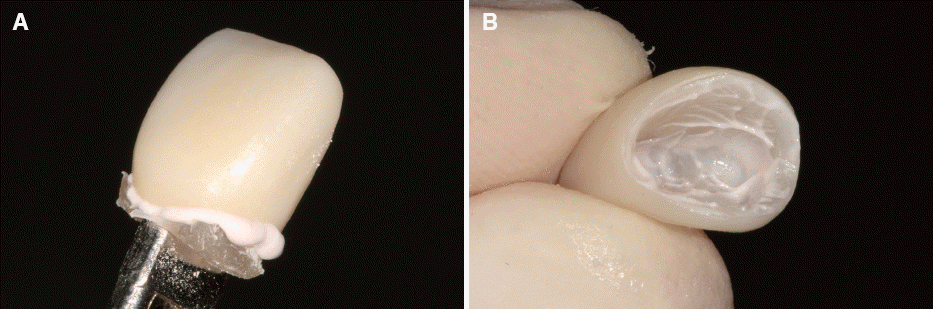
For fabricating the abutment replica with HMA, a thin layer of petroleum jelly (Vaseline, Unilever, London, UK) was applied to the inner surface of the zirconia crown using a microbrush (Microbrush International, Grafton, USA). The HMA (GS1085, Okong, Incheon, Korea) was filled inside of the restoration using an electronic glue gun (G250, Okong, Incheon, Korea). Dowel pin (Twin pin, World D&D Co., Seoul, Korea) was placed into the HMA and the replica was immersed into water to determine the space for cement after shrinkage (Fig. 3A). If any defect was found on the surface of HMA abutment replica in this stage, a small amount of HMA could be used re-fill the restoration and re-seat the replica. After HMA was cooled, any excess HMA present in the margin of the abutment replica was trimmed with a knife (Fig. 3B). After that, the custom abutment was connected to the implant for 30 Ncm with electric torque wrench (iSD 900, NSK Inc., Kanuma, Japan). The occlusal contact of the restoration was adjusted using a conventional procedure. After 10 minutes, screw was re-tighten10 and screw hole was filled with cotton pellet and composite resin (Filtek z250, 3M EPSE AG, Seefeld, Germany). The inner surface of the restoration was cleaned with airborne particle abrasion. Resin cement (RelyX ultimate clicker, 3M EPSE AG) was applied along the margin with minimum amount.11 The HMA abutment replica was seated to the restoration with a light pressure (Fig. 4A). Any excess cement around the margin was wiped and the abutment replica was immediately pulled off. After confirming that the cement has been evenly applied to the inner surface of the restoration (Fig. 4B), the restoration was seated on the abutment within the oral cavity. Any cement flowing outside was removed after the cement was hardened (Fig. 5). Patient instruction for cleaning was conducted. At re-call check appointments after 1, 3, 6 months, no exudation or pus discharge was observed. The patient was satisfied with the esthetics and function of the prostheses.
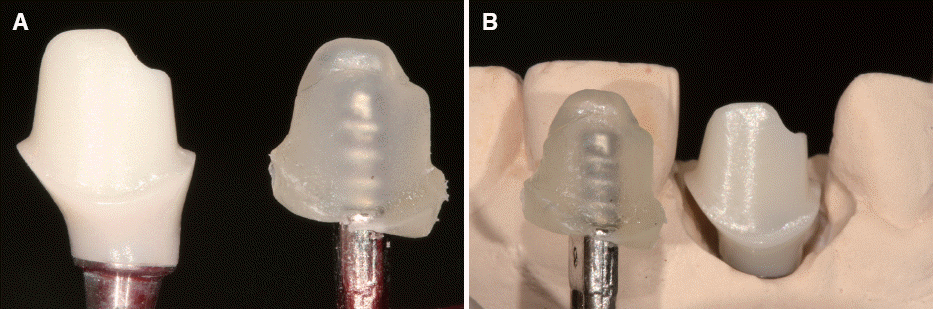 | Fig. 3(A) Fill the restoration with melted HMA and place the dowel pin, (B) Zirconia custom abutment (right) and hot melt adhesive material replica (left).
|
Go to :
Discussion
Restoration with subgingival margin is widely used for aesthetics in anterior area. Since the emergence profile of anterior implant prostheses is rapidly widened, it is highly likely for cement to retain between the abutment and gingival.12 However, complete removal of excess cement is difficult. Undetected cement might cause periimplantitis. The risk of undetected excess cement is well known.13 In the process of removing cement with a plastic or titanium instrument, scratch can occur on the implant abutment, which can accelerate plaque and bacterial deposition.14 Even though cement with water-solubility or radiopacity is used, it is difficult to find cement that is thinly remained on the surface of the abutment or gingiva.15 Factors that can determine the amount of excess cement include the amount of cement used, viscosity and flowability of the cement, margin location, ability to remove unset cement, abutment material, and abutment shape.15
To minimize excess cement and obtain proper retention, using abutment replica is effective.2 Abutment replica can be fabricated by duplicating the abutment with resin or polyvinyl siloxane material. This case report introduced a technique to fabricate abutment replica with HMA at chairside. As excess cement can be removed before seating the restoration to abutment, the remained cement can be minimized after cementation. However, this technique has a limitation. Because even shrinkage of HMA cannot be controlled, uniform and precious space for cement cannot be obtained. Nonetheless, this simple technique can be used for cementation of implant restoration with subgingival margin to minimize excess cement. Since it needs no additional laboratory procedure, it is quick and effective.
Go to :
Conclusion
In this case report, the abutment replica was simply fabricated with hot melt adhesive material to minimize the excess cement of anterior implant prosthesis in dental office. Since the excess cement is harmful to the peri-implant tissue, the biologic complication can be reduced for using this technique.
Go to :
ORCID
Chi-Won Seo http://orcid.org/0000-0003-0745-8199
A-Reum Han http://orcid.org/0000-0002-9432-7244
Jae-Min Seo http://orcid.org/0000-0001-5095-4046
Jung-Jin Lee http://orcid.org/0000-0002-7381-5230
Go to :
 XML Download