This article has been
cited by other articles in ScienceCentral.
Abstract
PURPOSE
To evaluate the fit of a crown produced based on a 3D printed model and to investigate its clinical applicability.
MATERIALS AND METHODS
A master die was fabricated with epoxy. Stone dies were fabricated from conventional impressions (Conventional stone die group: CS, n=10). Digital virtual dies were fabricated by making digital impressions (Digital Virtual die group: VD, n=10). 3D data obtained from the digital impression was used to fabricate 3D printed models (DLP die group: DD, n=10, PolyJet die group: PD, n=10). A total of 40 crowns were fabricated with a milling machine, based on CS, VD, DD and PD. The inner surface of all crowns was superimposed with the master die files by the “Best-fit alignment” method using the analysis software. One-way and 2-way ANOVA were performed to identify significant differences among the groups and areas and their interactive effects (α=.05). Tukey's HSD was used for post-hoc analysis.
RESULTS
One-way ANOVA results revealed a significantly higher RMS value in the 3D printed models (DD and PD) than in the CS and DV. The RMS values of PD were the largest among the four groups. Statistically significant differences among groups (P<.001) and between areas (P<.001) were further revealed by 2-way ANOVA.
CONCLUSION
Although the fit of crowns fabricated based on the 3D printed models (DD and PD) was inferior to that of crowns prepared with CS and DV, the values of all four groups were within the clinically acceptable range (<120 µm).
Go to :

Keywords: Marginal and internal fit, Intra oral scanner, Digital light processing, 3D printing model, PolyJet
INTRODUCTION
New developments in digital technology have resulted in great changes in the dental field.
1 Since computer-aided design and computer-aided manufacturing (CAD/CAM) technology, from existing industries, has been rapidly introduced and applied to the dentistry, dental CAD/CAM has been developing faster. In recent years, the use of intra-oral scanners to replace conventional impressions and the use of 3D printers to change the manufacturing process have accelerated and augmented the development of CAD/CAM systems even more.
2
In order to produce accurate and customized dental prostheses, the accuracy should be maintained in all manufacturing processes, such as impression, wax pattern manufacturing, investing, and casting. Although CAD/CAM does not require all those processes, the production of accurate impressions is an important step in the manufacturing of prostheses.
345 In general, the better the accuracy of the impression, the closer the degree of proximity between restoration and abutment and the better the internal and marginal fit of restorations.
67
Not only the impression, but also the accurate model is an essential factor for making prosthesis with an accurate fit.
8 There are two available impression methods to create models for manufacturing prostheses. The first is the conventional impression method that uses elastomeric impression materials, and the second is the digital impression method that uses an intraoral scanner to provide digital data.
Although conventional impression methods have been successfully used in dental clinics for many years, the inconveniences experienced by patients and distortion of the impression bodies and stone models have been indicated as disadvantages. On the other hand, the digital impression method has several advantages, such as the reduction of chair-time, patient convenience, and data preservation and reproducibility. The digital impression method is not yet widely used in dental clinics, but with the performance enhancement of the intraoral scanner, it seems to be rapidly replacing the conventional impression methods.
5
Intraoral digitization helps acquire data directly from prepared teeth, through the digital impression. Therefore, it is no longer necessary to fabricate stone models and make an impression with elastomeric materials.
9
Thus, if the digital impression comes to regular use in dental clinics, stone models will gradually disappear, and other type of models will be required.
Methods to manufacture models by using data obtained from the digital impression are largely divided into subtractive and additive manufacturing methods. The subtractive manufacturing consists of using the milling technique, while additive manufacturing consists of accumulating materials, layer by layer. Compared with the conventional milling techniques, the advantages of additive manufacturing include the ability to generate fine details such as undercuts, voids, and complicated internal shapes,
10 without wasting material.
1
3D printers are used in orthodontics and surgery for orthodontic models and surgical guides for implants. In the future, however, it is expected to become widely used to fabricate actual models for prosthodontics, orthodontics, and surgery, and to fabricate prostheses such as crowns, copings, and partial denture frameworks.
11
In clinical cases where digital impression is recorded with an intraoral scanner, it is not mandatory to print the actual models for all of them. However, the use of 3D printed models seems to be inevitable in cases such as full mouth rehabilitation or for the porcelain fusing procedure after the production of porcelain coping.
11
The 3D printers used in this study are photopolymerization 3D printers namely the PolyJet and digital light processing (DLP), which use photoreactive liquid resin. The principle of DLP is the same as the technology used in beam projectors for presentations. The principle being a model is formed by projecting a digital mask on ultraviolet (UV) curable resin with high resolution projection light of the DLP projection device. The digital mask is produced in a software by transforming 3D solid data designed with 3D CAD into drawing data. PolyJet is similar to the inkjet printing method. However, instead of spraying ink onto the paper, the print head sprays the microscopic layers of liquid photopolymer onto the build tray and cures them directly with UV light.
Although there are several studies on the accuracy and reproducibility of 3D printed models for diagnosis, models for fixed dental prostheses requiring accurate manufacturing have been rarely studied. Hence, the purpose of this study is to determine whether the 3D printed model, which is currently in trend, can be applied clinically to the prosthetic field. For this purpose, we manufactured crowns in the 3D printed dies (DD; DLP die, PD; PolyJet die) and compared the marginal and internal fit with crowns manufactured in conventional stone die (CS) and digital virtual die (VD). The null hypothesis was that no difference would be found in the fits of the crowns among the groups (CS, VD, DD and PD) and between the marginal and internal areas.
Go to :

MATERIALS AND METHODS
A typodont model (AG-3 ZPVK, Frasaco GmbH, Tettnang, Germany) of maxillary right first molar, fabricated for a full coverage crown was prepared. The model was replicated with epoxy materials (Modralit 3K, DentamidDreve GmbH, Unna, Germany), and subsequently used as the master model. To obtain the surface reference dataset, the master model was digitized with the Comet LED 3D scanner (Steinbichler Optotechnik GmbH, Neubeuern, Germany), which is a high-resolution reference scanner with 6 µm of accuracy, according to the manufacturer. The sample size (n = 10 per group) was determined by power analysis (effect size = 0.61, α = 0.05, power = 0.80).
To fabricate the conventional stone die, dual-viscosity impressions of the master die were made using polyvinyl siloxane impression material (Honigum-Light and Heavy, DMG Dental GmbH, Hamburg, Germany) (n = 10). The impressions were subsequently poured with type IV dental stone (FujiRock, GC Europe, Leuven, Belgium). The stone dies were scanned with a reference scanner to obtain the dataset for the CS.
Ten digital impressions were made with the CS-3500 intraoral scanner (Carestream Dental, Atlanta, GA, USA), according to the manufacturer's recommendation. Subsequently, 3D data was transformed into stereolithography (STL) files and stored as digital virtual dies.
To fabricate the 3D printed dies, 20 digital impressions were made by the above-mentioned intraoral scanner (Carestream Dental, Atlanta, GA, USA). Subsequently, the 3D data was exported as STL dataset. The exported STL files were fabricated as 3D printed dies by using the 3D printers: DLP (3Dent dental model printer, EnvisionTEC, Gladbeck, Germany) and PolyJet (Objet EDEN260V, Stratasys Ltd., Eden Prairie, MN, USA). In printing 10 dies each, DLP took about one and a half hours, whereas PolyJet took about one hour. After printing was completed, each 3D printed die was carefully separated from the build platform. DLP dies were cleaned with ethanol and then were post-cured for 30 minutes using an ultraviolet light-curing unit. Most of the support material was removed from PolyJet dies, using a high-pressure water jet. After being immersed for approximately one hour in a 2% solution of caustic soda, residual support material was completely removed. All 3D printed dies were scanned with a reference scanner to obtain the dataset for the DD and PD.
The scanned 3D STL files were imported by using the dental CAD software (DentCAD, Delcam plc., Birmingham, UK) and designed as maxillary right first molars. The occlusal, axial, and margin cement spacer were set as 0 µm and radius correction was set at 0.6 mm. The design files were saved in STL file format and imported with the CAM software (GO2dental, GO2cam Intl., Lyon, France). Next, the crowns were milled from a polyurethane block (innoBlanc model, innoBlanc GmbH, Rastede, Germany) by the 5-axis milling machine (DWX-50, Roland DG Corp., Irvine, CA, USA). A total of 40 crowns (10 crowns per group) were milled.
The inside of the completed crown after milling was scanned with the reference scanner. To secure a precise superimposition, all data sets were collapsed into areas of interest by removing all artifacts and areas below the margin, with the 3D evaluation software (Geomagic Verify 2015, 3D Systems Inc., Rock hill, SC, USA).
In order to superimpose the data, master model data and data of the inside of the crown were automatically aligned. For the accurate arrangement, “best fit alignment” command was applied. Subsequently, the whole deviation showing values with color map was applied and the ranges between the upper and lower limits of tolerance and between maximum and minimum tolerance were set as 10 µm and 100 µm. Differences in measurements between the scanned master model data and the digitized crown data were drawn by RMS. RMS was calculated by using the following equation:
where
n is the sum of measured points,
x1,i is the measuring point of master model and
x2,i is the measuring point of data obtained by scanning the inside of crown. In this study, lower RMS value indicates high 3D consistency. Therefore, RMS was used to measure the dimensional differences between the master model and inner side data of the digitized crown.
12
In addition, the differences were measured by dividing the 3D data into marginal and internal areas on the criterion of a line that was steeply curved toward the axial wall.
The mean and standard deviation of the RMS values in each group at the marginal and internal areas were calculated. One-way ANOVA was conducted to verify significant differences in marginal and internal RMS values among groups. In addition, two-way ANOVA was also performed to identify significant differences in RMS based on the type of group and area, and the interaction between them. The post-hoc analysis used Tukey's Honest Significant Difference (HSD) test. The level of statistical significance was set at 0.05 for both statistical methods. All statistical values were analyzed using statistics software package (IBM SPSS Statistics v24.0, IBM Corp., Chicago, IL, USA) (
Fig. 1).
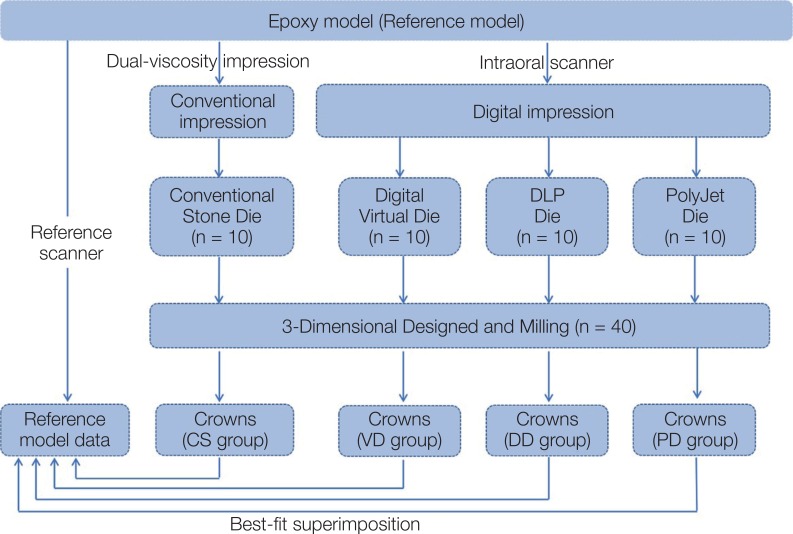 | Fig. 1Flow chart depicting the experimental design of this study.
|
Go to :

RESULTS
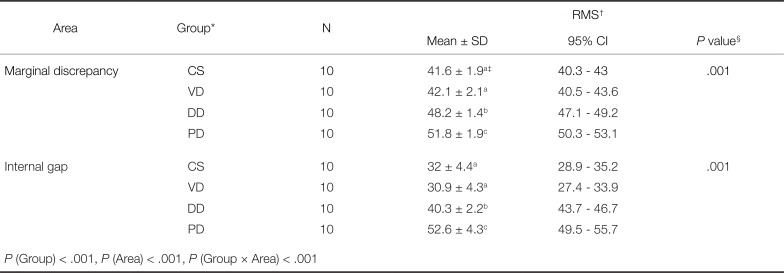
The mean and standard deviation values of RMS by groups in the marginal and internal areas are listed in
Table 1. The RMS value of CS and VD were similar but the RMS values of 3D printed die groups (DD and PD) were higher than those of CS and VD in both areas. Also, the RMS values of PD were the largest among the four groups. Statistically significant differences were found among the groups in both the marginal and internal areas with the one-way ANOVA test (
P < .001 and
P < .001). The Tukey post-hoc analysis revealed that the RMS values of PD were significantly higher than those of the other three groups, and the RMS values of DD were significantly lower than those of PD. No significant differences were found between CS and VD. According to the two-way ANOVA analysis, differences in group and area were statistically significant in
Table 1 (group:
P < .001, area:
P < .001). In addition, the significant interaction among the groups and areas was observed (
P < .001), indicating that there is statistical difference in RMS values based on the type of group and area.
Table 1
Mean RMS values for marginal discrepancy and internal gap (unit: µm)
|
Area |
Group*
|
N |
RMS†
|
|
Mean ± SD |
95% CI |
P value§
|
|
Marginal discrepancy |
CS |
10 |
41.6 ± 1.9a‡
|
40.3 – 43 |
.001 |
|
VD |
10 |
42.1 ± 2.1a
|
40.5 – 43.6 |
|
DD |
10 |
48.2 ± 1.4b
|
47.1 – 49.2 |
|
PD |
10 |
51.8 ± 1.9c
|
50.3 – 53.1 |
|
Internal gap |
CS |
10 |
32 ± 4.4a
|
28.9 – 35.2 |
.001 |
|
VD |
10 |
30.9 ± 4.3a
|
27.4 – 33.9 |
|
DD |
10 |
40.3 ± 2.2b
|
43.7 – 46.7 |
|
PD |
10 |
52.6 ± 4.3c
|
49.5 – 55.7 |
|
P (Group) < .001, P (Area) < .001, P (Group × Area) < .001 |

The color difference map represents qualitative information analyses. The discrepancies between the master model and the inner side data of the crown are shown on the color map. The color bar ranges from −100 µm (dark blue) to 100 µm (red), and an acceptable error between −10 µm and 10 µm was marked as green. In addition, the positive discrepancies from yellow to red represent a larger part than the master model, while the negative discrepancies from sky blue to deep blue colors represent a smaller part than the master model. The CS and VD color maps seemed to be similar. Two groups showed yellow and orange (positive discrepancies) in the vertical slopes and red in the occlusal ridges (
Fig. 2A, 2B). PD showed orange and red (positive discrepancies) in the vertical slopes (Fig. 2C). Blue (negative discrepancies) was partially shown in CS and VD groups at the marginal area (
Fig. 2A, 2B). On the contrary, DD predominantly displayed blue (negative discrepancies) in the vertical slopes of the internal area (
Fig. 2C). Red (positive discrepancies) was partially shown in DD and PD groups at the marginal area (
Fig. 2C, 2D).
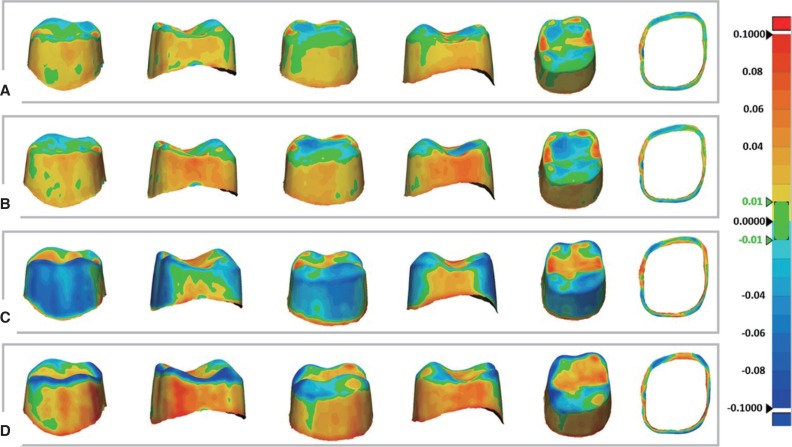 | Fig. 2Color difference maps of marginal and internal discrepancies. Color map was set from −100 (dark blue) to +100 µm (red). Negative discrepancy (sky blue to dark blue) indicates smaller crown than master model, while positive discrepancy (yellow to red) indicates larger crown than master model. (A) CS, (B) VD, (C) DD, (D) PD.
|
Go to :

DISCUSSION
The purpose of this study was to evaluate the marginal and internal fit of crowns produced based on a 3D printed model in order to investigate the potential clinical applicability of it in the dental prosthetic field. There were statistically significant differences in the fit of crowns among groups (CS, VD, DD, and PD) and between areas (marginal and internal). Thus, the initial null hypothesis was rejected.
The 3D printed model used in this study was operated by DLP and PolyJet method. No studies have been performed to evaluate the marginal and internal fit of crowns produced based on 3D printed models by DLP and PolyJet. However, Anadioti et al.
1314 measured the fit of crowns produced based on a stereolithography (SLA) model, which is a type of 3D printed model. The authors demonstrated a better marginal and internal fit of crowns produced based on stone model than 3D printed models, which is in line with our present results.
Our present results indicated that the fit of crowns produced based on the 3D printed models (DD and PD) were inferior to those of the stone (CS) and digital virtual models (VD). We also found that the fit of the PD group was the worst. The significant difference among the groups is due to differences in the molding principles and manufacturing methods of 3D printers. The 3D printing method accumulates material layer by layer. The thickness of the layers of the DLP 3D printer used in this study is 50 µm, whereas that of the PolyJet 3D printer is 16 µm. Due to the thickness of these layers, dimensional errors often occur on the Z-axis.
15 Due to surface irregularities caused by the formation of these layers, the accuracy of scanning may be lower than the stone model with a smooth surface.
14 The biggest difference between DLP and PolyJet lies in the post-process method. DLP performs the post curing after the build process, but PolyJet does not perform additional post-curing. The blue color in the vertical slopes that appeared in the DD group is thought to be caused by contraction due to post-curing. On the other hand, the orange and red color in the vertical slopes that appeared in the PD group is thought to be due to incomplete removal of support material formed in the build process (
Fig. 2C, 2D).
The present results also indicated significant differences between the areas, i.e., marginal and internal fit of crowns. In all the groups, the marginal fit was larger than the internal one (
Table 1). This is because of the machining variability and lower scanning point density in the marginal area of steep curvature.
12 These findings are consistent with previous studies.
16 Anadioti et al.
1314 reported an average marginal and internal fit of crowns produced based on the SLA model of 84 µm and 145 µm. Both values are larger than those in our present study, which may be because of the different material of restoration they have used and because the value of spacer was set at 40 µm.
Moreover, to mill the internal angle to a diameter smaller than the diameter of the smallest fitting burs, some software will instruct additional internal milling. This function is referred to as radius correction. The red area on the occlusal line angle appears to be due to this reason.
17
Still, there was no consensus on the maximum marginal discrepancies that could be considered as clinically acceptable. In several previous studies, the clinically acceptable values of the marginal discrepancies for CAD/CAM restorations have widely ranged from 30 to 141 µm according to different reports.
18 McLean and von Fraunhofer
19 have studied over 1,000 intraoral restorations for 5 years, and reported that the maximum clinically acceptable marginal discrepancy was 120 µm. Despite the lack of scientific evidence, this value has been considered as the criteria in most studies so far.
The clinical acceptance of internal gaps is also defined differently for each study. In several previous studies, the values of 29 to 195 µm have been reported for the internal fit of CAD/CAM restorations.
18 However, clinically acceptable values of the internal gaps of fixed dental prostheses have not been defined yet.
20
In the present study, the mean values of the marginal fit were 41.6 µm for CS, 42.1 µm for VD, 48.2 µm for DD, and 51.8 µm for PD. Furthermore, the mean values of the internal fit were 32 µm for CS, 30.9 µm for VD, 40.3 µm for DD, and 52.6 µm for PD. All these values were less than 60 µm, which is smaller than the reported clinically acceptable limit of 120 µm.
19 Although experimental methods, materials of restoration, and types of model are different, these values are similar with the fits of CAD/CAM restorations in several previous studies.
131621
In this study, we used a high precision scanner to control the clinically inherent error as much as possible. In addition, the CAD program is an “open” system that can design restorations with STL data obtained by all dental scanners; and the milling machine is a 5-axis equipment suitable for complex shape and undercut machining.
Methods to measure the marginal and internal fit between the crown and abutment teeth include 2D and 3D analyses. The 2D analysis is mainly performed by cutting the crowns, abutment, or model or using the silicone replica technique. This method has some disadvantages in that it damages the specimens or only partially measures the fit. On the other hand, the 3D analysis has some advantages because it is nondestructive and visualizes the entire deviation through the color map.
16 Our study used the 3D analysis method.
To control the variables in the experiment, this study used polyurethane blocks as the material of the crowns. The blocks minimize the problems of expansion and contraction during milling. Therefore, they were processed with the same size as the designed forms.
22 It is not light-reflective material like zirconia, so it is ideal for scanning and suitable for 3D evaluation. Furthermore, the cement spacer was set at 0, in designing the maxillary right first molar by using the CAD program, in order to acquire an accurate RMS value. Mously et al.
23 reported that the internal gap increases as the spacer value increases. There are also studies showing that the fit of the crowns varies depending on the spacer value set with a variety of thicknesses.
242526 Furthermore, there is a study explaining that the set spacer value does not match the actually reproduced spacer thickness.
27 Therefore, in this study, we tried to control the error that could happen as much as possible by setting the inner spacer value to 0.
The present study was limited to the analysis of the fit of a single tooth. Therefore, a study that is expanded to long-span bridges and full-mouth rehabilitation is warranted. The spacer setting value exerted an effect on the fit of definitive prostheses, due to the irregularity of surfaces and variation of Z-axis, which were not evaluated in this study. Therefore, further studies are required to evaluate the effect of the spacer setting value that is proper for the 3D printed models.
Go to :

CONCLUSION
Within the limitations of this in vitro study, the following conclusions were drawn. The mean values of the marginal discrepancy and internal gap in all groups ranged from 30.9 to 52.6 µm, still within the clinically acceptable range (< 120 µm). However, the fits of crowns produced based on the 3D printed models (DD and PD) were inferior to those of the stone (CS) and digital virtual models (VD). Therefore, it is necessary to improve the 3D printer before clinical application of 3D printed models in the field of dental prostheses.
Go to :


 PDF
PDF ePub
ePub Citation
 Print
Print


 XML Download