

 PDF
PDF ePub
ePub Citation
 Print
Print


Introduction
If the crown of anterior tooth is fractured, it can be treated in a variety of ways such as fragment re-attachment, build-up using composite resin, laminate veneers and full crown. When crown fractured site is built-up with composite resin, 'Natural layering technique' can be used.1 Various transparencies and colors of resin are necessary, and the lingual or palatal wall may also be needed. In case of small defects, it may be possible to build up the enamel back wall directly with a gloved finger tip. But in case of large Class IV lesion in need of lingual or palatal wall, the restoration should be built up using a thin enamel mass; functional design as well as the correct positioning and thickness of the whole restoration will be made much easier by the use of shaping aids or negative forms.2 The silicone-index technique that fashions a palatal silicon impression for ideal tooth model is the simplest available method.3 Clinicians can use wax-up technique or pre-restoration technique for silicon impression, and the latter is the better choice for single-visit treatment. In the following case reports, we introduce pre-restoration index technique on Class IV defect by using temporary filling material.
Case report
Case 1
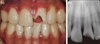
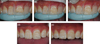
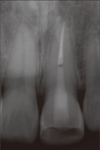
An 18 year old male with fractured maxillary left central incisor (Tooth 21) following a motorcycle accident came to the department of conservative dentistry, Kyung Hee university dental hospital. A clinical and radiographic examination revealed crown fracture on tooth 21 with pulp exposure and enamel fracture on maxillary right central incisor (Tooth 11) (Figures 1a and 1b). Tooth 21 was sensitive to percussion. Patient did not bring the fragment of Tooth 21 and he wanted quick and esthetic recovery. Root canal treatment and composite resin restoration using pre-restoration index technique was planned for Tooth 21, while simple resin restoration was planned for Tooth 11.
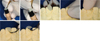
On his first visit day, root canal treatment was done under rubber dam isolation (Figure 2). Shades of tooth were evaluated (Figure 3a) using the VITAPAN classical shade guide (Vident, Brea, CA, USA) for resin selection. Fermit-N (Ivoclar vivadent, Schaan, Liechtenstein) was applied to the tooth defect. Approximate shape was made by gloved fingers (Figures 3b and 3c) and then putty impression was taken (Figures 3d and 3e).
The putty index was partially cut between Tooth 11 and Tooth 21, and a celluloid strip was inserted to isolate Tooth 21 from Tooth 11 (Figure 4a). Palatal and interproximal enamel walls were modeled and opaque resin was layered (Figure 4b). Then, the access cavity was filled with resin (Figure 4c). The body of tooth was built up using composite resin with various shades (Figures 4d and 4e) and the labial surface was covered with enamel resin (Figure 4f). Finally, finishing and polishing was performed (Figure 5).
At one week follow up, scaling was performed and the fractured incisal enamel of Tooth 11 was restored.
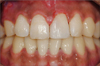
At one month follow up, the restoration was well-maintained and gingiva was healed (Figure 6).
Case 2
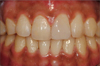
A thirty-year old male visited the clinic due to fracture of maxillary left central incisor (Tooth 21) by car accident. Though he went to emergency room of another hospital just after accident, he did not get any particular dental treatment. During the clinical and radiographic examination, there was no pulpal exposure on Tooth 21, but patient complained of discomfort upon ice and hot tests. He was diagnosed as crown fracture with reversible pulpitis on Tooth 21 and enamel fracture on maxillary right central incisor (Tooth 11) (Figure 7a).
Patient hoped for rapid and esthetic single-visit treatment. Composite resin restoration using pre-restoration index technique was planned for Tooth 21, and simple composite resin restoration was planned for Tooth 11. It was explained to the patient that root canal treatment may be necessary on Tooth 21 depending on the patient's symptom during follow-up.
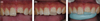
In this case, Fermit (Ivoclar vivadent) was used to form appropriate shape and putty impression was taken (Figures 7b and 7c). After index and celluloid strips were placed, palatal and interproximal enamel walls were modeled and opaque resin was layered (Figures 8a and 8b). The body of tooth was built up using various shades of composite resins (Figure 8c) and enamel resin was applied as the labial surface (Figure 8d). Finally finishing and polishing was performed (Figure 8e).
At next visit in clinic, the patient complained of pain at rest on Tooth 21. Root canal treatment on Tooth 21 was performed and then Tooth 21 was restored with fiber post and composite core (Figure 9). At three weeks after restoration, fractured incisal enamel of Tooth 11 was restored and shade of Tooth 21 was modified.
Discussion
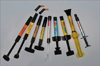
Temporary filling materials such as in Figure 10 are usually used after tooth preparation for inlay or onlay. And some manufacturers provide products with different elasticity, high and low. In this case report, we used two kinds of products from one manufacturer and found out that low elastic material is easier to manipulate because high elastic material has sticky and slumping properties.
When we put the temporary filling material on a tooth, it was more convenient to place appropriate single mass on a tooth rather than step by step. And it was also easier to make shape by touching material little by little with gloved fingers than using applicators. After making a putty index, we separated material from model by placing an explorer on the margin (Figure 11).
Comparing to the wax-up technique, pre-restoration technique using temporary filling material makes a single-visit treatment possible and has advantage of no need for the dental laboratory procedure. Making index using temporary filling material is more economical than using composite resin. Moreover it is possible to maintain exact shape that the clinician wants due to low slumping property. It is also easily separated from the model and tooth.


 XML Download