Journal List > J Adv Prosthodont > v.7(3) > 1054260

Kim, Kim, and Kim: Impact of surface roughness of gypsum materials on adaptation of zirconia cores

Abstract

PURPOSE

The present study investigated the influences of various gypsum materials on the precision of fit of CAD/CAM-fabricated prostheses and analyzed their correlation with surface roughness.

MATERIALS AND METHODS

The master model of the mandibular right first molar was replicated, and four experimental groups based on two types of Type IV stone (GC Fujirock EP, Die keen) and two types of scannable stone (Aesthetic-Basegold, Everest Rock) were created to include a total of 40 specimens, 10 in each group. The surface roughness of the working models for the respective experimental groups was measured. Once the zirconia cores had been fabricated, the marginal and internal fits were measured with a digital microscope using the silicone replica technique. The mean and standard deviation of the respective points of measurement were computed and analyzed through the one-way ANOVA and Tukey's HSD test. The correlation between surface roughness and the precision of fit of the zirconia core was analyzed using the Pearson correlation analysis (α=.05).

RESULTS

The zirconia cores fabricated from the scannable stone working models exhibited a superior precision of fit as compared to those fabricated from the Type IV stone working models. The correlation analysis results showed a clear positive correlation between surface roughness and the precision of fit of zirconia cores in all of the experimental groups (P<.05).

CONCLUSION

The results confirmed that the surface roughness of dental working models has a decisive influence on the precision of fit of zirconia cores.

INTRODUCTION

Forming an accurate impression of the patient's oral environment and fabricating a working model from gypsum that accurately reproduces the relationship with the abutment teeth are two of the most important processes in prosthesis fabrication.1 In order to create an accurate working model, the clinician must be fully aware of the physical properties presented during the curing reaction, as well as the effect of post-curing on the mechanical and chemical characteristics. Moreover, the clinician must select a gypsum material that can compensate for the amount of shrinkage. Also, the gypsum material used during fabrication of the model must not only be simple to use but also possess minimum porosity.2
To fabricate a working model for the purposes of dental prosthesis fabrication, Type IV stone (gypsum) is widely used. The reason for its wide use is that it is easy to manipulate, affordable, and appropriate for elastic impression materials. Although Type IV stone is white, the gypsum is dyed and is now commercially available in various colors including yellow, light yellow, green, and gray. With the recent trend of increasing the frequency of fabricating dental prosthesis through CAD/CAM, scannable stone for working model scanning has been released onto the market and is widely sold on a global scale. According to the International Organization for Standardization (ISO) No. 6873: 2013,3 scannable stone is defined as a Type IV stone with calcium sulfate hemihydrate as the major component. Because this stone is resin-reinforced, it does not require the application of fine powder (major component: TiO2) to the surface of the working models for scanning. Moreover, unlike conventional dental gypsum, scannable stone has no shine, it minimizes microbubbles, and it exhibits high reproducibility owing to its ultrafine powder. When manufacturers seek to sell scannable stone, they often market the product as a superior version of Type IV stone. The majority of scannable stone products are further differentiated from Type IV stone by exhibiting an extremely low expansion (0.07%) and permitting a long working time and curing time. Also, scannable stone exhibits a very smooth surface and a very low surface roughness, resulting in superior scannability. Manufacturers of scannable stone have also claimed that scannable stone has superior dimensional stability and robustness as compared to Type IV stone.45
Dental stone must satisfy specific requirements in order to be useful for fabricating a precise prosthesis. The basic requirements of dental stone include compatibility with impression materials, dimensional stability, surface hardness, abrasion resistance, ease of manipulation, lack of toxicity, and low surface roughness.67 In particular, surface roughness is a factor that influences the marginal and internal adaptation of the prosthesis. As such, an ideal working model exhibits a smooth and seamless surface in order to omit the extraneous internal adjustment process of the final prosthesis due to the rough surface of the working model. The rough surface of the marginal area especially inhibits the fabrication of a perfect marginal fit. Therefore, selecting an appropriate stone that exactly reproduces the smooth surface of the impression material is important.8
Thus far, various gypsum materials are sold depending on the purpose. ISO No. 6873:20133 evaluates the physical properties of dental gypsum, such as the curing time, expansion rate, compressive strength, and microreproducibility, among others, and because these properties are mostly handled, they comprise the most basic properties of dental gypsum. However, detailed and practical studies on the efficacy and adequacy for clinical applications are somewhat lacking. Although there was a study that reported the accuracy and precision of dental arch models fabricated using a three-dimensional subtractive rapid prototyping method depending on the type of casting material used,9 this study was primarily conducted by comparing the models by linear measurements. The majority of the precedent studies either involved a comparative study on the expansion rates of the working models8 or a study on various working models fabricated from different types of casting materials and comparing the precision of fit of the resulting prostheses of a given abutment tooth.10 Because the above precedent studies focused on evaluating traditional prosthesis fabrication methods (that is, without the use of CAD/CAM), they are not very applicable to the present situation of exponentially increasing prosthesis fabrication through dental CAD/CAM systems.
Through the recent development of dental scanners and CAD programs, we are now able to freely manipulate three-dimensional (3D) digital models, and thus studies that examine the influence of dental materials on the CAD process have been introduced. According to a study by DeLong et al.11 non-contact optical scanning is influenced by the target object's color, transparency, and surface texture when converting the object to a 3D digital model. Likewise, Rodriguez et al.12 reported that the color and transparency of a casting or impression material affect the resolution or quality of the 3D digital model produced by the laser optical scanner.
Therefore, in the present study, we selected two types of scannable stone and two types of Type IV stone that are currently widely used in the dental clinical setting. We attempted to evaluate the precision of fit of the zirconia cores fabricated from the working models using the selected gypsum materials. Through this process, we investigated the influence of the surface roughness of the different types of dental stone on the zirconia cores fabricated through the CAD/CAM process. Our goal in this study was to establish the clinical efficacy of scannable stone. The null hypothesis of the present study was "the precision of fit of thezirconia cores has no correlation with the surface roughness of the dental stone."

MATERIALS AND METHODS

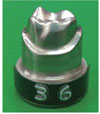
In the experiment, the maxillary right first molar was selected as the abutment tooth to facilitate the repetitive measurements of various measurement points during the precision-of-fit measurements. In order to fabricate the master model, the abutment was prepared after selecting a standard full arch model fabricated from resin (AG-3, Frasaco GmbH, Tettnang, Germany). The tooth was subjected to a mean axial wall taper of 5° at the margin and at the rounded slope of the chamfer. In addition, the tooth was subject to a 1 mm offset at the axial surface and a 1.2 mm offset at the occlusal and incisal surfaces. Using the digital abutment model as a reference, the master model was fabricated by means of titanium machining (Arum DEG 5X, Doowon, Daejeon, Korea) (Fig. 1). In order to create the working model, the master model was replicated into impression molds using a silicone impression material (Deguform®, DeguDent GmbH, Hanau, Germany). Then, a wetting agent (Picosilk®, Renfert, Hilzingen, Germany) was applied internally onto the duplicate casts. We prepared two types of Type IV stone, Fujirock EP® (GC Europe N.V, Leuven, Belgium) and Die Keen® (Heraus Kulzer Inc., Armonk, NY, USA), and two types of scannable stone, Esthetic Base Gold® (Dentona, Detmold, Germany) and Everest® Rock (Kavo Dental GmbH, Biberach, Germany), by using a vacuum mixer system for 30 seconds according to the water/powder (W/P) ratio as established by the manufacturer (Table 1). Then, we carefully inserted the casting stone into the replica mold to prevent the occurrence of microbubbles from vibration. After 1 hour, the casting model was separated from the replica master model. Ten working models were fabricated for each casting stone type. The fabricated working models were stored at a temperature of 22 ± 2℃ and a humidity of 45 ± 5% for 24 hours prior to the precision-of-fit measurements. By repeating the above process, a total of 40 working models comprising 10 working models per experimental group were fabricated.
The surface roughness tester used in the experiment was a contact-based surface roughness tester (SV-3000S4, Mitutoyo, Tokyo, Japan). The experiment was performed with a total of 40 working models, 10 in each group, using four types of gypsum materials. When measuring the posterior cylindrical form of the working model, we used a fixation jig to fix the measured side on top. The vertical movement handle was turned to match the vertical position of the stylus so that the set meter dashboard would read zero. The measurement conditions were stylus: 1.2, measurement length: 1.69 mm, speed: 0.05 mm/s, and filter: Gaussian. The measurement apparatus standard was set to JIS1994, and the measured values were adjusted using the standard. For each working model, we measured the average surface roughness (Ra) of separate measurement points of the working model and used their mean as the overall surface roughness value. After measuring the surface roughness, the surfaces of all the samples were subjected to multifocus observation using a digital microscope (HK-7700, HIROX, Tokyo, Japan) at its original magnification (×20) in order to observe the surface roughness pattern through 3D observation and analysis.
The first step in constructing the zirconia cores was the preparation of digital impressions by scanning the 40 working models with a laser oral scanner (Lava™ Scan scanner, 3M ESPE, Seefeld, Germany). The second step involved using the requisite CAD program on the scanned digital impressions to design the zirconia cores. Once the prosthesis design was completed, the file was sent to a milling machine (Lava™ Form Milling unit, 3M ESPE, Seefeld, Germany) to manufacture pre-sintered zirconia blocks (Lava™ Frame, 3M ESPE, Seefeld, Germany). The resulting zirconia prostheses were fully sintered in a furnace (Lava™ Therm Furnace, 3M ESPE, Seefeld, Germany). The final 10 zirconia cores were then tested by fitting onto their respective cast abutments.
To measure the precision of fit of the zirconia cores, we used the precision-of-fit definition used by Beuer et al.13 and Kokubo et al.14 According to the above definition, the marginal area was designated as a-b, the rounded chamfer area as c-d, the axial wall area as e-f, and the occlusal area as g-h and i-j. The five measurement points delineated above were divided into four parts (Fig. 2). The marginal and internal fits were measured using the silicone replica technique. This is a method in which the internal space between the dental prosthesis and the abutment tooth is measured by replicating the space with silicone and measuring the silicone thickness. The reliability and accuracy of the method were verified in previous studies. After filling the completed zirconia core with light-body silicone (Aquasil Ultra XLV; Dentsply Caulk, Milford, CT, USA), the core was immediately placed onto a stone die and held in place by finger pressure. In order to sustain a uniform pressure, an electric scale was used to maintain a constant force of 50 N. The cured light-body silicone was then carefully separated from the core. The resulting light-body silicone film represented the space between the core and the die. Since the film exhibited very little resistance to tear and difficulty in maintaining structural integrity, a stronger heavy-body silicone (Aquasil Ultra Monophase; Dentsply Caulk, Milford, CT, USA) was also applied in order to stabilize the silicone film. The completed silicone replica was segmented in the medial, distal, buccal, and lingual directions with a razor blade. In order to increase the reliability of the measurement, the five points of fit were measured five times by one person and their average values computed. The silicone thickness was observed using a digital microscope at ×160 magnification (KH-7700; Hirox, Tokyo, Japan) (Fig. 3).
All of the statistical analyses in the present study were performed using IBM SPSS® Statistics ver. 20 for Windows (SPSS® Inc., IBM Company, Chicago, IL, USA). We calculated the mean and standard deviation of the marginal and internal fits of the respective experimental groups by measuring the 40 total samples using an electron microscope. Based on the normality test results, we performed a one-way ANOVA and a Tukey's HSD test to analyze the results of the experiment. To investigate the correlation between the surface roughness of the four different casting stones and the zirconia core precision of fit, we found the Pearson correlation coefficient. The significance level was set to P<.05.

RESULTS

The surface roughness difference of the respective dental stones according to the experimental groups was relatively small. Statistical analyses for comparisons among the experimental groups showed no significant differences (P>.05) (Table 2). The scannable stone experimental groups (SCAN1, SCAN2) were shown to have lower surface roughness, thereby showing smoother surfaces than the Type IV stone experimental groups (TY1, TY2) (Fig. 4).
The mean ± SD results of the zirconia core marginal and internal gap measurements with respect to the two different types of dental stone and total of four experimental groups are shown in Table 3. As a result of statistically analyzing all the measurement points by categorizing them as marginal or internal areas, the respective experimental groups exhibited a significant difference in the marginal area (a-b) and the occlusal area (i-j) (P<.05). In an overall gap representing the mean of both the marginal and internal gap, the four experimental groups also exhibited a significant difference (P<.05). Post-experimental analysis showed that experimental groups TY2 and SCAN2 exhibited differences in the overall gap. Overall, the scannable stone experimental groups exhibited smaller marginal and internal gaps as compared to the Type IV stone experimental groups (Table 3).
In order to analyze the correlation between the zirconia core precision of fit and the surface roughness of the casting stones, we performed a Pearson correlation analysis. As a result, it was shown that the correlation coefficient (r) of all of the experimental groups (TY1, TY2, SCAN1, SCAN2) ranged from 0.526 to 0.718 to exhibit a clear positive linear correlation (P<.05). As the surface roughness value decreased, the gap between the abutment tooth and the zirconia core was shown to decrease (Table 4).

DISCUSSION

One of the most important requirements of dental stone is accurately replicating the anatomical conditions of the patient's oral environment in order to fabricate an accurate final prosthesis. According to ADA specification No. 25, gypsum can exhibit an expansion of 0.2%, thus significantly influencing the displacement in the working model.6 Furthermore, although a full arch working model is relatively small in size, it must demonstrate volumetric stability and reproducibility by accounting for the 3D structure of the teeth, the possible presence of undercut, and various arch forms. As such, the selection of an appropriate type of gypsum is considered to be of the utmost importance. In order to obtain a precise prosthesis from the study of the oral environment, the fabrication of an accurate working model is the starting point.8
To this end, we used the four different types of dental stone to fabricate working models. Then, we used the CAD/CAM system to fabricate zirconia cores from the respective working models in order to evaluate their precision of fit based on the marginal and internal fit of the prosthesis. Furthermore, we measured the surface roughness of the working model in order to analyze its correlation with the precision of fit of the final prosthesis. As a result of measuring the surface roughness of the dental stones, it was shown that the stones within the same experimental group (representing a single type of dental stone) exhibited nearly identical surface roughness values. However, there was a difference in surface roughness between the TY experimental group and the SCAN experimental group (Table 2). As a result of comparing the marginal and internal fits of the respective experimental groups, it was shown that the TY and SCAN experimental groups exhibited a statistically significant difference (P<.05). Also, an analysis of the different areas of the working models revealed that surface roughness at the marginal area (a-b) and the occlusal (i-j) area resulted in a significant difference in the precision of fit of the zirconia cores (Table 3). As a result of computing the Pearson correlation coefficient in order to investigate the correlation between the surface roughness of the different stone types and the precision of fit of the zirconia cores, it was shown that the two variables exhibited a clear positive linear correlation (P<.05). Therefore, it was confirmed that the dental stone used during the process of converting the working model to a 3D digital model through a CAD program can influence the precision of fit of the resulting prosthesis.
The surface roughness of dental stones is influenced by their suitability with the impression material and the impression material type. Other factors that influence the surface roughness of casting stones include the particle size of the stone powder, filler additives, and the use of surfactants.151617 A study by Keuter and Davidson16 comparing casting stone surface roughness with respect to alginate reported that the surface roughness of the alginate impression material itself influences the surface roughness of the casting stone. In other words, the influence of the type of casting stone itself on the casting stone's surface roughness was small. However, an elastic impression material with superior surface roughness can vary the surface roughness of the working model depending on the type of casting stone used. They also reported that the surface roughness of the casting stone injected into the elastic impression material was far more superior if the particle size of the casting stone powder was smaller. Because the present study fabricated working models by using molds created from the same type of elastic impression material, the results of the present study confirmed that there was a difference in the fineness of the powder particles between the scannable stone and the Type IV stone.
According to a precedent study, the surface roughness of the abutment tooth can influence the resolution or precision of the scan data during the CAD process to influence the precision of fit of the final prosthesis.1819 In another study on the respective steps of the zirconia core fabrication process, the 3D scan data entry of a primarily deleted abutment tooth can possibly result in increasing marginal and internal gaps.20 In light of such results, the present study demonstrated the differentiated superiority of scannable stone as compared to Type IV stone with respect to their resulting zirconia core precision of fit.
Through such experimental methods, we must determine whether the measured results of the present study are within the clinically permissible range of values. There have been many precedent studies on the clinically permissible range of the marginal gap. According to the American Dental Association (ADA), the clinically acceptable marginal gap is 25-40 µm, set in ADA specification No. 8.21 However, it is difficult to achieve such precision of fit in reality. Sorensen et al.22 reported that the marginal gap must be less than 50 µm in order to inhibit bone loss due to marginal errors. McLean and von Fraunhofer reported23 that a marginal gap of less than 80 µm cannot be radiologically distinguished, and even a probe 80 µm in diameter cannot distinguish a gap of 200 µm. In a study that investigated 1000 prostheses that had been mounted in an oral environment for at least five years, a marginal discrepancy of approximately 100 µm was found to rarely cause clinical problems. In addition, the clinically acceptable maximum marginal gap was determined to be 160 µm.23 Consequently, the clinically accepted marginal gap should be a minimum of 50 µm, with a typical range of 100-200 µm. The marginal gaps of the zirconia cores measured in the present study were all within the clinically acceptable range. Furthermore, the internal gap must be evaluated according to a clinically accepted standard as it influences prosthesis maintenance. Jørgensen and Esbensen24 reported that a difference of 20-140 µm in cement thickness has only a moderate influence on prosthesis maintenance. Only with an internal gap of 140 µm and above is there a significant reduction in maintenance capacity. On the other hand, Passon et al.25 reported that even a cement thickness of approximately 151 µm did not result in a reduction of prosthesis maintenance capacity. The internal gap measured in the present study exhibited an internal fit that was within the clinically acceptable range as per the precedent studies.
In the CAD process for zirconia core fabrication, there are settings for various factors. While entering three-dimensional data of the preliminarily deleted abutment, scanning scatter can occur because of optical factors, such as surface texture and surface angles of reflection from the working model; this can make the acquisition of precise digital models difficult.26 Given the results of this study, the zirconia core in the scannable stone group with uniform surface roughness showed superior fitness compared with that in the Type IV stone group with a relatively rough surface; this suggests that the physical and chemical properties of the scannable stone influenced the resolution and quality of the three-dimensional digital models, along with the resin reinforcement that distinguished it from existing Type IV stone.
As a result of the present study, the zirconia cores fabricated from the scannable stone group exhibited clinically acceptable marginal and internal fits and a uniform machined surface. Also, the superior clinical efficacy of scannable stone as compared to Type IV stone was demonstrated along with the observation of differentiated surface roughness. As such, the scannable stone exhibited superior precision of fit for the resulting zirconia core. However, the present study has the following limitations: The number of samples used in the study was small; the measurements were taken using standardized models in vitro; respective studies have different definitions and terminologies with respect to areas measured to test for precision of fit, so using precision of fit as the only metric of comparison presents a degree of limitation in generalizing the results of the present study.

CONCLUSION

Zirconia cores fabricated from scannable stone working models exhibited superior precision of fit as compared to those fabricated from Type IV stone. In particular, there was a statistically significant difference between scannable stone and Type IV stone with respect to the marginal and occlusal areas (P<.05). Likewise, the surface roughness results were also superior for the scannable stone working model as compared to the Type IV stone working model. The correlation analysis results showed that all of the experimental groups exhibited a clear positive correlation, confirming that the surface roughness of the dental stones indeed influenced the precision of fit of the zirconia cores. Finally, none of the measured results of the experimental groups of the present study exhibited a measurement value that exceeded clinically permitted values as established by precedent studies.

Figures and Tables

Fig. 1

Master model.

jap-7-199-g001
Fig. 2

Zirconia core to abutment teeth diagram showing measurement points to determine adaptation.

jap-7-199-g002
Fig. 3

Photograph of cross section of silicone replica measured at ×160 magnification using a digital microscope.

jap-7-199-g003
Fig. 4

Multifocus images of the surfaces of various gypsum materials (×20). (A) TY1, (B) TY2, (C) SCAN1, and (D) SCAN2 groups.

jap-7-199-g004
Table 1

Various gypsum materials used in the study

jap-7-199-i001
Group Brand name Characteristic Manufacturer Lot. number
TY1 GC Fujirock EP Type IV GC Corp, Tokyo, Japan #5110009
TY2 Die keen HerausKulzer Inc., NY, USA #9606295
SCAN1 Aesthetic-Basegold Scannable stone Dentona, Detmold, Germany #51220303
SCAN2 Everest Rock Kavo Dental GmbH, Biberach, Germany #5110009
Table 2

Mean ± SD (µm) of the surface roughness (Ra) in various gypsum materials

jap-7-199-i002
Group N Brand name Ra P
TY1 10 GC Fujirock EP 0.09 ± 0.04 .059
TY2 10 Die keen 0.11 ± 0.06
SCAN1 10 Aesthetic-Basegold 0.06 ± 0.01
SCAN2 10 Everest Rock 0.08 ± 0.02
Table 3

Mean ± SD (µm) of silicone film thickness for all measurement points for the different gypsum materials

jap-7-199-i003
Points Group mean (SD) P value
TY1 TY2 SCAN1 SCAN2
a-b 48.75 ± 19.22A 53.22 ± 18.51A 41.66 ± 13.13B 44.56 ± 16.93A .046
c-d 56.62 ± 17.34 57.81 ± 13.13 47.11 ± 16.40 50.66 ± 12.80 .097
e-f 52.81 ± 14.36 55.27 ± 17.04 45.12 ± 12.71 49.43 ±19.70 .104
g-h 64.15 ± 16.75 69.91 ± 21.11 57.61 ± 19.87 61.48 ± 16.96 .122
i-j 72.71 ± 14.96A 76.12 ± 15.44A 63.34 ± 10.79B 67.80 ± 11.26A .039
Total 61.44 ± 13.33A 66.24 ± 18.92A 52.88 ± 15.66B 56.78 ± 14.67A .041

Capital letters indicate statistical significance (P<.05) by one-way ANOVA and Tukey's HSD test (α=.05). Values with the same letter are not statistically different from each other.

Table 4

Correlation between zirconia core adaptation and surface roughness

jap-7-199-i004
Group Adaptation Surface roughness Pearson r P value
TY1 61.44 0.09 0.610 .001
TY2 66.24 0.11 0.526 .001
SCAN1 52.88 0.06 0.718 .001
SCAN2 56.78 0.08 0.641 .001

Notes

This study was supported by 2015 Research Grant, Kyungdong University.

References

1. Al-Abidi K, Ellakwa A. The effect of adding a stone base on the accuracy of working casts using different types of dental stone. J Contemp Dent Pract. 2006; 7:17–28.
2. Anusavice KJ. Phillip's science of dental material. 11th ed. Philadelphia: WB Saunders;2003. p. 621–654.
3. ISO 6873. Dental gypsum products. International Organization for Standardization. 3rd ed. Geneva: Switzerland;2013.
4. Retrieved April 12, 2014. Available from http://en.zhermack.com/ImagePub.aspx?id=120081.pdf.
5. Kim KB, Kim JH, Kim WC, Kim HY, Kim JH. Evaluation of the marginal and internal gap of metal-ceramic crown fabricated with a selective laser sintering technology: two- and three-dimensional replica techniques. J Adv Prosthodont. 2013; 5:179–186.
6. American Dental Association. Specification No. 25 for dental gypsum products. Certification program for dental materials. Chicago: American Dental Association;1990. p. 1–14.
7. Millstein PL. Determining the accuracy of gypsum casts made from type IV dental stone. J Oral Rehabil. 1992; 19:239–243.
8. Duke P, Moore BK, Haug SP, Andres CJ. Study of the physical properties of type IV gypsum, resin-containing, and epoxy die materials. J Prosthet Dent. 2000; 83:466–473.
9. Kim JH, Kim KB, Kim WC, Kim JH, Kim HY. Accuracy and precision of polyurethane dental arch models fabricated using a three-dimensional subtractive rapid prototyping method with an intraoral scanning technique. Korean J Orthod. 2014; 44:69–76.
10. Linke BA, Nicholls JI, Faucher RR. Distortion analysis of stone casts made from impression materials. J Prosthet Dent. 1985; 54:794–802.
11. DeLong R, Pintado MR, Ko CC, Hodges JS, Douglas WH. Factors influencing optical 3D scanning of vinyl polysiloxane impression materials. J Prosthodont. 2001; 10:78–85.
12. Rodriguez JM, Curtis RV, Bartlett DW. Surface roughness of impression materials and dental stones scanned by non-contacting laser profilometry. Dent Mater. 2009; 25:500–505.
13. Beuer F, Aggstaller H, Edelhoff D, Gernet W, Sorensen J. Marginal and internal fits of fixed dental prostheses zirconia retainers. Dent Mater. 2009; 25:94–102.
14. Kokubo Y, Nagayama Y, Tsumita M, Ohkubo C, Fukushima S, Vult von Steyern P. Clinical marginal and internal gaps of In-Ceram crowns fabricated using the GN-I system. J Oral Rehabil. 2005; 32:753–758.
15. Williams GJ, Wild S, Bates JF. A study of some factors affecting the surface properties of dental stone. Br Dent J. 1984; 156:46–53.
16. Keuter FM, Davidson CL. Surface roughness of dental stone casts from alginate impressions. J Dent. 1986; 14:23–28.
17. Nanami T, Ostlund SG. Surface texture of stone model setting against elastomer impression materials. Swed Dent J. 1984; 8:251–255.
18. Ender A, Mehl A. Influence of scanning strategies on the accuracy of digital intraoral scanning systems. Int J Comput Dent. 2013; 16:11–21.
19. Karl M, Graef F, Schubinski P, Taylor T. Effect of intraoral scanning on the passivity of fit of implant-supported fixed dental prostheses. Quintessence Int. 2012; 43:555–562.
20. Luthardt RG, Sandkuhl O, Herold V, Walter MH. Accuracy of mechanical digitizing with a CAD/CAM system for fixed restorations. Int J Prosthodont. 2001; 14:146–151.
21. Reports of councils and bureaus: Revised American National Standards Institute/American Dental Association Specification No. 8 for zinc phosphate cement. J Am Dent Assoc. 1978; 96:121–123.
22. Sorensen SE, Larsen IB, Jörgensen KD. Gingival and alveolar bone reaction to marginal fit of subgingival crown margins. Scand J Dent Res. 1986; 94:109–114.
23. McLean JW, von Fraunhofer JA. The estimation of cement film thickness by an in vivo technique. Br Dent J. 1971; 131:107–111.
24. Jorgensen KD, Esbensen AL. The relationship between the film thickness of zinc phosphate cement and the retention of veneer crowns. Acta Odontol Scand. 1968; 26:169–175.
25. Passon C, Lambert RH, Lambert RL, Newman S. The effect of multiple layers of die-spacer on crown retention. Oper Dent. 1992; 17:42–49.
26. Persson AS, Andersson M, Odén A, Sandborgh-Englund G. Computer aided analysis of digitized dental stone replicas by dental CAD/CAM technology. Dent Mater. 2008; 24:1123–1130.
TOOLS
ORCID iDs

Ki-Baek Kim
https://orcid.org/http://orcid.org/0000-0003-3821-9764

Jae-Hong Kim
https://orcid.org/http://orcid.org/0000-0002-2679-8802

Sa-Hak Kim
https://orcid.org/http://orcid.org/0000-0002-5893-6413

Similar articles