INTRODUCTION
Exciting new technologies have been introduced in the dental industry during the past few decades. The dental computer aided design-computer aided manufacturing (CAD-CAM) system was developed as an alternative to the traditional lost wax technique and casting method to produce more effective and standardized fixed dental prostheses (FDPs).
1 FDPs based on the CAD-CAM system are made in a stepwise process using computer software, whereas FDPs made by the traditional method are produced completely by manual labor.
Selective laser sintering (SLS) is a new manufacturing technology in dentistry. SLS, which is one of the rapid prototyping (RP) production methods, uses a high-temperature laser to beam selectively substructure metal powder based on the CAD data with the FDP design. A thin layer of the beamed area becomes burnt and the FDP is completed by laminating these thin layers. The metal-ceramic crown is currently one of the most commonly used FDPs, and the lower core is mostly produced by the lost wax technique and casting method. However, the advantages of SLS are that it saves material, time, and expenses and the production is simpler compared to the existing methods.
2
Previous studies have reported that the high temperature produced during the process of porcelain firing on the top of the core when producing the metal-ceramic crown causes transformation of the core
3 and affects the gap of the finished metal-ceramic crown.
4 Lakhani et al.
5 reported that transformation occurs because of the type of alloy used in the core for producing the metal-ceramic crown, the release of the remaining stress that occurs during casting and cold processing, and the different thermal expansion coefficients of the metal and porcelain. Nickel-chromium (Ni-Cr) alloy was used previously as the material for the metal-ceramic crown core, but Ni was shown to produce allergic reactions in the body.
6,
7 Thus, the use of the cobalt-chromium (Co-Cr) alloy is increasing and methods for producing a Co-Cr alloy core by SLS are being introduced in addition to the existing casting methods.
Many requirements must be met for proper function and durability of FDPs, among which the FDP gap is one of the most important factors.
8-
10 Foster
10 analyzed 142 failed FDP cases and reported that one of the most common reasons for failure is inappropriate gap. In the past, the marginal and internal gap were evaluated either by applying the FDP to the abutment, cutting it, and observing the cross-section under a microscope,
11 or by using the silicone replica technique.
12,
13 The disadvantages of these two methods are that they are two-dimensional (2D) and it is difficult to measure the gap from different directions because these methods measure the cross-section of a cut specimen or the silicone replica. Although at least 50 points on one tooth should be measured to assess the gap of FDPs,
14 most studies that measured gap using traditional methods cannot not meet this requirement.
11-
13,
15 On the contrary, computerized measurement techniques are very accurate and enable three-dimensional (3D) measurements. Compared to the existing methods, computer-based techniques are non-destructive and enable measurements in a natural setting without the need for cutting. Other advantages over existing methods include more reliable measurements and more accurate information regarding the gap of the FDP owing to the ability to measure from various directions.
16,
17
The marginal and internal gaps of the lower core made using the SLS have been previously studied,
2,
18,
19 but studies on the effect of high temperature, which is required during the firing of the upper porcelain, on the marginal and internal gaps of the finished metal-ceramic crown are very limited. The purpose of this study was to measure the marginal and internal gap of the core and the finished metal-ceramic crown using 2D and 3D replica techniques. By comparing the measured gap, the study aimed to evaluate whether the high temperature produced during the construction and firing over the lower core affects the marginal and internal gaps of the finished metal-ceramic crown. Furthermore, we compared the marginal and internal gaps of FDPs made using the SLS technique to FDPs made using the conventional casting methods to assess whether the clinical use of FDPs made using the SLS technique is possible.
Go to :

MATERIALS AND METHODS
For this study, the maxillary right first molar was designed as the abutment (Frasaco GmbH, Tettnang, Germany). The margin was removed with a depth of 1.2 mm in the Chamfer form and the angle of the adjacent surface was set at 6° to create the master model in titanium (
Fig. 1). To produce the study model, a mold was created using silicone (Deguform, DeguDent GmbH, Hanau-Wolfgang, Germany) on the titanium master model. To minimize errors in the scanning stage of the completed mold, 10 study models were created by using a scannable dental stone (Everest®Rock, KaVo Dental GmbH, Biberach/Riβ, Germany).
4,
11,
12,
14,
15 A sample size of 10 was determined to detect a difference of one SD difference between measurements before and after porcelain firing with a significance level of 0.05 and approximately 80% power.
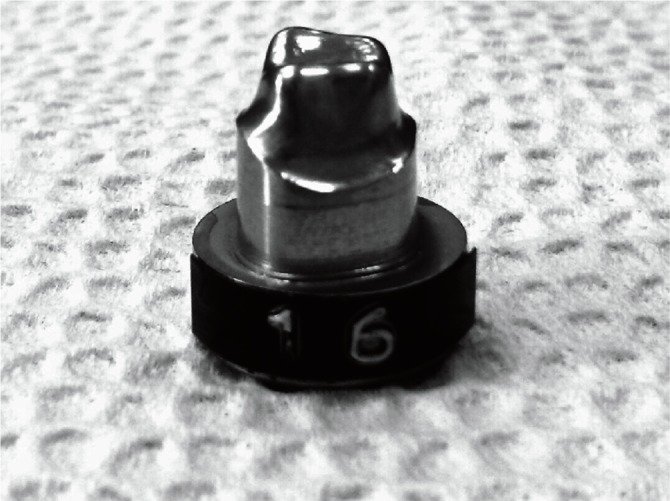 | Fig. 1Titanium master model (1.2 mm and 360° chamfer form preparation was made on a maxillary right first molar). 
|
To produce Co-Cr alloy cores using the SLS technique, scanning was completed on 10 study models using a D-700 dental scanner (3Shape A/S, Copenhagen, Denmark). A skilled technician designed the core using the 3shape Dental Designer CAD program (3shape A/S) with the finished scanned digital model. The cement thickness was set as 30 µm, starting from 0.5 mm behind the margin, as suggested by the manufacturer. The thickness of the core was set at 0.5 mm. After completing the design of the 10 cores, 10 Co-Cr alloy cores (EOS Cobalt-chromium SP2; EOS GmbH, Krailling, Germany) were completed for the experimental group using the EOSINT M270 SLS technique (EOS GmbH) based on the data for each core. The Co-Cr SP2 powder (Co: 61.8-65.8, Cr: 23.7-25.7, W: 4.9-5.9, Mo: 4.6-5.6, Si: 0.8-1.2, Fe: max 0.5, Mn: max 0.1) meets the EN ISO 9693 standards for the thermochemical requirements of metal-ceramic crowns, the EN ISO 7504, EN ISO 10993-1 and EN ISO 10993-5 standards for biological gap, and cell toxicity requirements.
The control group was produced using the lost wax technique and casting method, which are currently the most commonly used methods for metal-ceramic crown production in the dental industry. In this method, a wax pattern is created on the model by using dental wax, a sprue is attached, and the final FDP is produced through the investing, firing, and casting processes. The same skilled technician who made the 10 study model cores using the SLS technique also made 10 Co-Cr alloy cores (Co: 63.3, Cr: 24.8, W: 5.3, Mo: 5.1 Si: max 1.0, Fe: max 1.0, Ce: max 1.0; Wirobond®C, BEGO GmbH, Bremen, Germany) using the lost wax technique and casting method.
The silicone replica technique was used to measure the marginal gap after the SLS core group and casting core group specimens were produced. Using this technique, the inside of the core was first filled with light body silicone (Aquasil Ultra XLV; Dentsply DeTrey GmbH, Konstanz, Germany) and pressure was applied along the major axis of the teeth at 50 N for 10 minutes (
Fig. 2A), until the light body silicone hardened. After hardening, the core was carefully removed from the study model, and the light body silicone was strengthened using medium body silicone (Aquasil Ultra Monophase; Dentsply DeTrey GmbH) (
Fig. 2B). This procedure is necessary because it is difficult to cut light body silicon accurately, since it does not maintain its shape. Therefore, reinforcing with medium body silicone enables accurate cutting from a specified direction.
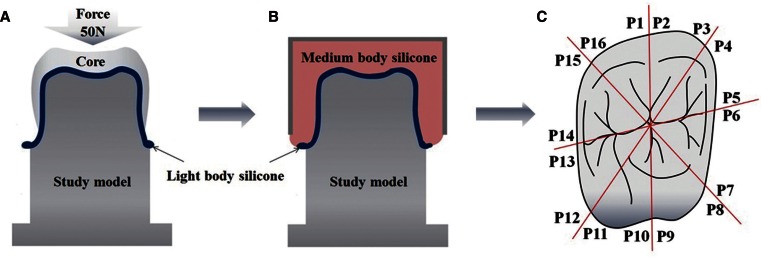 | Fig. 2Two-dimensional replica technique. A: The inside of the core was first filled with the light body silicone and pressure (50 N for 10 min), B: Stabilization of the light body silicone using medium body silicone, C: The silicone replica sectioned four times (red line) and sixteen marginal points (P1-P16) were measured on each specimen. 
|
To measure the marginal gap, the silicone replica was cut into eight pieces after it was completed (
Fig. 2C). A total of 16 points per specimen, based on the surface of the cross-section (
Fig. 2C), were measured, and the average was defined as the marginal gap for each specimen. The marginal gap measurement was made under ×160 magnification using a KH-7000 digital microscope (HIROX, Tokyo, Japan), and the vertical distance from the abutment tooth to the FDPs was measured as described previously (
Fig. 3).
20 A total of 20 specimens were measured 320 times.
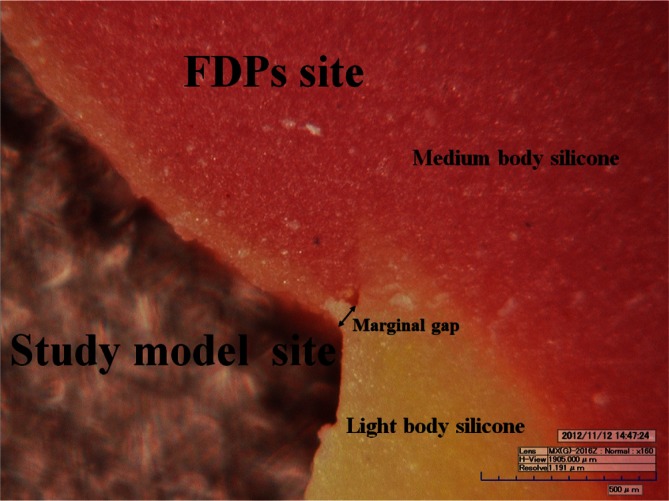 | Fig. 3Measurement of marginal gap by digital microscope at ×160 magnification (Orange color: light body silicone; purple color: medium body silicone). 
|
The internal gap of the specimens were measured using the 3D replica technique. According to this method, the study models were digitalized by scanning with an Identica dental scanner (Medit, Seoul, Korea) (
Fig. 4A). After scanning, the inside of the FDPs of the study model was filled with light body silicone (Aquasil Ultra XLV; Dentsply DeTrey GmbH) in a manner similar to the conventional silicone replica technique. Subsequently, 50 N of pressure was applied along the long axis for 10 minutes. Because the extra-light body silicone flows out in the direction of the FDPs and interferes with 3D measurements, this substance was carefully removed before the silicone hardened. After the light body silicone hardened, only the FDPs were carefully removed from the model and the light body silicone replica was kept on the teeth model while a digital replica was made using a dental scanner (Identica; Medit).
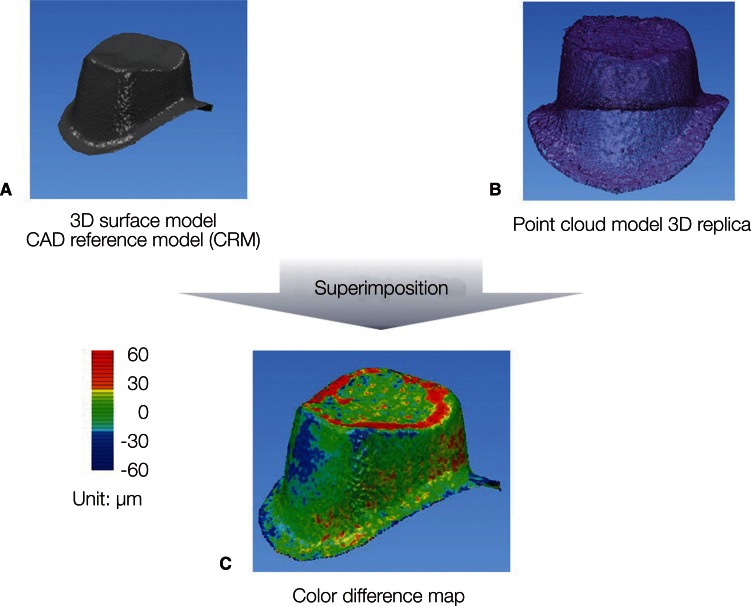 | Fig. 4Three-dimensional replica technique. A: The 3D surface model from the digitization of the study model used as the control model (CAD reference model; CRM), B: The point cloud model is the digitization of the light body silicone, C: The point cloud model is projected onto the surface of the CRM. The distribution of the internal gaps was measured and depicted on the color different map. 
|
To measure the internal gap of the digitalized replica, the Copy CAD program (Delcam, Birmingham, UK) was used to obtain the point cloud from the digital replica file. A total of 67,491 points were obtained (
Fig. 4B). The Power INSPECT program (Delcam) was used to measure the internal gap. The digital model and the point cloud file from the digital replica were superimposed (
Fig. 4C). The reference point for superimposition was based on 3D surface model obtained by scanning the study model. The superimposition of the 3D surface model (CAD reference model; CRM) and the point cloud model (3D replica) was performed through the process of alignment the corresponding matrix based on a number of planes dividing the bucco-lingual and mesio-distal. The mean of the values at all of the points on the superimposed images were defined as the internal gap for the corresponding FDPs, and the internal gap was measured at 67,491 points per specimen (
Fig. 4).
After measuring the marginal and internal gap of the two groups, all 20 specimens in the groups were made into metal-ceramic crowns. A skilled technician constructed the crowns using dental porcelain (VITA VM13, VITA Zahnfabrik H. Rauter GmbH, Bad Säckingen, Germany) on top of the metal core according to conventional methods, and fired them in a furnace to finish the 10 cast metal-ceramic crowns and 10 SLS metal-ceramic crowns. The marginal and internal gaps of the 20 finished metal-ceramic crowns were measured using the 2D and 3D replica techniques in a manner similar to the measurement of the metal core marginal and internal gaps.
The Wilcoxon signed-rank test was conducted to determine whether the marginal and internal gaps of the metal core and the finished metal-ceramic crown were significantly different between each group. Furthermore, the Wilcoxon rank-sum test was conducted to determine whether the marginal and internal gaps of the cores and metal-ceramic crowns that were made using the conventional lost wax technique and casting method or the recently introduced SLS technique were significantly different. The final model was constructed using nonparametric ANCOVA with rank transformed data
21 to reveal significant difference under adjustment of related factors. The type one error rate was set at 0.05. The IBM SPSS version 20 (SPSS, Chicago, IL, USA) was used for all statistical analyses.
Go to :

RESULTS
The means and standard deviations of the marginal and internal gap of the core and metal-ceramic crown in the two groups (casting and SLS) are shown in
Table 1. The Wilcoxon signed-rank test revealed a statistical significance in increase of marginal gap after firing in both Cast group (
P=.012) and SLS group (
P=.007), while only marginally significant or insignificant results were obtained for internal gap in Cast group (
P=.059) or SLS group (
P>.05), respectively (
Table 1). The gap increase of the two groups before and after porcelain firing, without distinguishing marginal and internal gap (total gap; average of marginal and internal gap),
19 was statistically significant (
P<.01) (
Table 1).
Table 1
Mean (SD) of marginal and internal gap for two groups (n=10) with results of the Wilcoxon signed-rank test (unit: µm)


The SLS group cores had higher values than the casting group cores, and the difference was statistically significant (
P=.045) (
Fig. 5). The finished metal-ceramic crown gap values were also significantly higher in the SLS group compared to the casting group (
P=.023) (
Fig. 5).
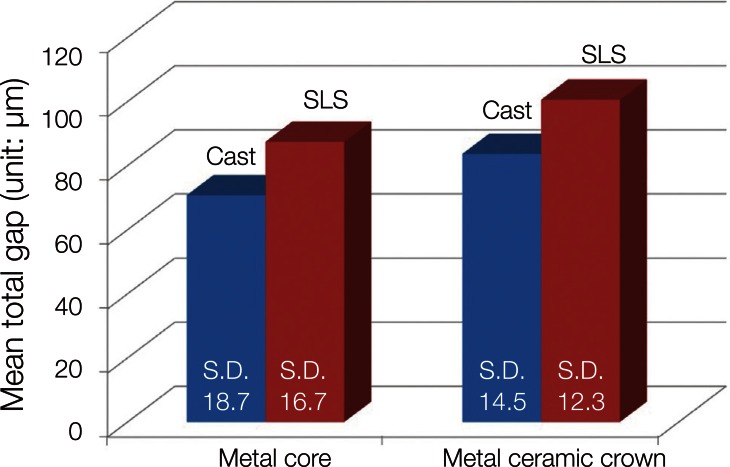 | Fig. 5Total mean and standard deviations (average of marginal and internal gap) for metal cores and metal-ceramic crowns of two groups (cast: conventional casting method; SLS: selective laser sintering method). Statistically significant differences between cast core and SLS core (P=.045), and between cast metal ceramic crown and SLS metal ceramic crown (P=.023). 
|
The final model was constructed using the nonparametric ANCOVA with rank transformed data to reveal whether the gaps of metal-ceramic crowns of the Cast and SLS group were significantly different under adjustment of gaps of metal cores, sites of measurements (marginal/internal). The mean gap of metal-ceramic crowns of the Cast group was significantly smaller than that of SLS group by 11.4 µm (95% confidence interval, 2.5-20.3 µm; P=.013 (data not shown).
Go to :

DISCUSSION
Several factors are considered when judging the clinical success of FDPs, and one of the most important is the marginal and internal gaps of the corresponding FDPs.
22 In this study, measurement methods used 2D and 3D replica techniques to assess whether the high temperature produced during the firing of porcelain on the upper part of the lower core while using the traditional casting and the SLS methods affects the marginal and internal gaps of the finished metal-ceramic crown. The data of present study show that in both methods, the high temperature produced during the metal-ceramic crown production increased both the marginal and internal gaps, and dental prostheses made from cast Co-Cr had better marginal and internal gaps than those made from SLS Co-Cr. Currently, insufficient data are available regarding the effect of the high temperature during the porcelain firing process on the marginal and internal gaps of metal-ceramic crowns made from cores produced using the SLS method.
The 3D internal gap analysis is unique
23 because most previous research on the gap of FDPs used 2D analysis. Existing measurements of the marginal and internal gaps of fixed FDPs were mostly made using 2D analysis, which is mainly conducted by cutting the FDPs, abutment, or model11 or using the silicone replica technique.
12,
13 In the FDP cutting method, the specimen is applied to the abutment or model, fixed and cut, and the cross-section is observed using a digital microscope or by scanning electron microscopy. Measurements cannot be made from various points with these methods, and the biggest drawback is that the FDPs and models are destroyed. In the silicone replica technique, the distance between the FDPs and the abutment or the model is replicated by using light body silicone, and the silicone replica is cut so that the cross-section can be observed with a digital microscope. Although this technique is non-destructive, measurements cannot be made from various points. Moreover, precise analysis is not possible since both methods use 2D measurements.
In this study, the 3D replica technique was used to measure the internal gap. In the process, negative values were found. In particular, this was found in the marginal region. It is considered that this is for the following reason. In order to produce the point cloud model (3D replica) using a dental scanner, it is considered that light body silicone of the margin was deformed in the process of removing excess light body silicone pouring from the inside of the prosthesis after replicating the space between prosthesis and model to the light body silicone. The excess light body silicone was removed because it was considered that this would have a negative impact on producing an accurate point cloud model (3D replica) by interfering with scanning. In order to eliminate such errors in the margin and obtain more reliable internal gap, the internal gap of the prosthesis was defined as the average discrepancy between CAD reference model and 67,491 points measured in occlusal surface and part of axial wall located 400 µm away from the margin. The measurement region of these internal gaps was based on the previous studies.
20 Although there may be various reasons for the negative values measured at some points, they are considered to be errors in the process of scanning, measurement and superimposition. This appears to be a limitation in this measurement method.
The accuracy and reliability of 3D analysis has been proven.
23 Using this method, 30,000 point measurements can be made when measuring the internal gap of a single FDP. This meets the requirement of a minimum of 50 points per tooth for measuring gap.
14 The limitation of this method is that marginal gap cannot be measured. Since the margin is a line and not a plane, an accurate point cloud cannot be obtained using a software program. To overcome this limitation, we used the 2D replica technique for marginal gap measurements, which has shown high reliability in previous studies.
24,
25
Previous studies have reported that the high temperature during the firing of the upper porcelain portion causes distortion of the lower metal core, resulting in an increase in the marginal and internal gaps of the finished metal-ceramic crown.
3-
5,
26 Buchanan et al.
26 reported that distortion occurs due to the difference in heat expansion coefficients of the lower metal and the upper porcelain and the difference in the degree of expansion during the firing of the upper porcelain. Hung et al.
15 reported that thermocycling increases the marginal opening. Furthermore, Shokry et al.
27 reported that the marginal discrepancy increases during the process of producing the core with the Ni-Cr alloy and titanium alloy and finishing the metal-ceramic crown, with the highest increase during the opaque treatment; the marginal discrepancy was largest with the Ni-Cr alloy. Extreme precision is required when investigating whether the marginal and internal gaps are affected by firing during the production of metal-ceramic crowns from the core. Therefore, measuring the gap from the maximum number of points can increase reliability. In this study, we tried to maximize the number of measured points to increase reliability. For each specimen, the marginal gap was measured at 16 points and the internal gap was measured at 67,491 points; therefore, a total of 67,507 points of measurement were made to increase reliability.
The SLS method is a newly introduced technique for producing metal FDPs and is currently being used widely in clinical practice; however, research on its clinical utility compared to traditional methods is limited. In a prior study,
18 the mean (SD) values of the internal gap of the core made using cast Ni-Cr, cast Co-Cr, and SLS Co-Cr were 58.2 (19.9) µm, 50.6 (25.1) µm, and 62.6 (21.6) µm, respectively, indicating that cast Co-Cr is the most superior and SLS Co-Cr has the greatest inner gap. Another study
19 compared the gap based on the Co-Cr (LW : lost wax technique), milled wax with lost-wax method Co-Cr (MW), milled Co-Cr (MC), and direct laser metal sintering Co-Cr (DLMS/SLS). The authors reported that DLMS had the highest mean (SD) at 84 (60) µm, followed by MW at 117 (89) µm, LW at 133 (89) µm, and MC at 166 (135) µm. Akova et al.
2 reported that the shear bond strength of cast Ni-Cr was the highest, followed by cast Co-Cr and SLS Co-Cr.
The internal gap of the cast Co-Cr core was superior to that of SLS Co-Cr core, consistent with the results of Ucar et al.
18, but opposite from the results of Örtorp et al.
19 This discrepancy is most likely due to specimen differences. This study evaluated a single-unit FDP, whereas Örtorp et al.
19 evaluated a three-unit FDP. Furthermore, the abutment used in this study was an anatomical teeth model, whereas the abutment of Örtorp et al.
19 was in a cylindrical form, which is rather different from the anatomical form of teeth. Although the anatomical teeth model form is more complex than that of the cylindrical model, which can lead to errors during manufacturing, this model is important for assessing clinical acceptability.
The results of this
in vitro study show that the gap increased in the metal-ceramic crown, compared to the core, and the gap of the SLS Co-Cr was larger than that of the cast Co-Cr. However, the gap did not deviate from the clinically permissible range. Although different opinions exist regarding the clinically permissible range of marginal and internal gap,
28-
30 120 µm is the value suggested by most researchers.
30 Therefore, these would be allowed for clinical use, and clinical studies with more varied types of cases will be necessary in the future.
Go to :


 PDF
PDF ePub
ePub Citation
 Print
Print


 XML Download