

 PDF
PDF ePub
ePub Citation
 Print
Print


INTRODUCTION
The term maxillectomy refers to partial or total removal of maxilla in a patient suffering from benign or malignant neoplasm. 1 The resultant surgical defect often includes part of hard and soft palate, which results in an oro-antral and/or oro-nasal communication.2 Maxillary obturator prosthesis is more frequent treatment modality than surgical reconstruction due to ease of fabrication and maintenance.3-6 The prosthesis recreates a partition between oro and naso-pharynx and facilitates improvement in mastication, deglutition and speech intelligibility.3,7 Increased weight of the obturator prosthesis is usually a major concern to the prosthodontist. The obturator should be light in weight to provide favorable retention, stability, support, patient comfort and cleanliness. To reduce the weight, methods to fabricate the hollow obturator prostheses were described in the previous literature. Both types of obturators allocate fabrication of the lightweight prosthesis that is readily tolerated by the patient, while effectively extending into the defect.8-10 The open-hollow obturators often collect moisture and require frequent cleaning or exit holes to prevent the fluid ccumulation.11 On the contrary, the closed obturators do not get moisture collection while extending it superiorly into the defect and reducing the air space.12 Different materials like Silicone rubber9,13 and visible-light-cured resin14,15 have been used to fabricate the obturators; however, the long-term strength and durability of these prostheses have not been studied. Need for a water-tight closed hollow obturator fabricated from a durable material is the prime objective in such situations. Heat-polymerizing acrylic resin is one of the most strong, tissue compatible and durable materials for the fabrication of such prostheses.9 Various methods have been described in the literature to fabricate the closed-hollow obturators in heat-polymerizing acrylic resin.9,11,16-40 Uniform wall thickness of a hollow prosthesis ensures the least possible weight without hampering the durability of the material. But most of the processing techniques, with which uniform wall thickness can be achieved, are complex and time-consuming. The processing technique described in this article is a single step procedure resulting into the closed-hollow obturator prosthesis as single unit with uniform wall thickness. To understand the technique well, this article describes a case report of a patient who had undergone partial maxillectomy secondary to squamous cell carcinoma rehabilitated with a hollow obturator prosthesis.
CASE REPORT
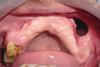
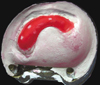
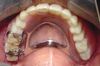
A forty-nine year old man was surgically operated for the squamous cell carcinoma of a left maxilla and was referred for the prosthodontic rehabilitation. Medical and dental history revealed surgical resection of the anterior and left posterior maxillary alveolar bone due to T3N2M0 squamous cell carcinoma 9 months ago. The patient received a total radiation dose of 7200 cGy (external beam radiation) within a period of 7 weeks with a fraction of 200 cGy/day for 5 days in a week. The patient had used an interim obturator (without teeth incorporation) for the past 6 months. Intraoral examination revealed well healed surgical defect in the maxillary left buccal vestibule creating an oro-antral communication (Fig. 1). All the three maxillary right molars and complete mandibular dentition were examined clinically as well as radiographically (panoramic) and found to be caries-free with no significant gingival/periodontal problems. Masticatory and phonetic functions of the patient were severely affected due to missing maxillary structures. The Orthopantomograph large radiolucency in the entire maxillary region except in left molar area. The patient was diagnostically classified as 'Class IV (severely compromised) clinical situation' according to the Prosthodontic Diagnostic Index (PDI) described by McGarry et al.41 Prosthetic rehabilitation was planned with a closed hollow definitive obturator.
TECHNIQUE
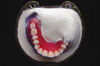
A maxillary master cast was obtained in a conventional manner and metal framework was designed in such a way that maximum support, stability and retention could be gained by the three molars present on right side. Cast metal framework was fabricated in a conventional manner. The fit of the metal framework was evaluated clinically. A record base was made with autopolymerizing acrylic resin (DPI RR Cold Cure; Dental Products of India, Mumbai, India) and occlusion rim was fabricated with baseplate wax (Modeling wax; Deepti Dental Products, Ratnagiri, India). Jaw relation was recorded and transferred on to the semi-adjustable articulator. Teeth arrangement and waxing-carving was completed (Figs. 2A and 2B) and evaluated intraorally. The waxed-up obturator was sealed with the master cast and invested in a base-flask (Handler Manufacturing, Westfield, NJ) with the help of type II Gypsum material (Dental plaster; Kalabhai Karson, Mumbai, India) (Fig. 3). All metallic components of the obturator were covered with investing-plaster except the teeth and waxed-up portion. Flasking procedure was completed in usual manner by pouring a type II gypsum material in a counter flask. The flask was kept under a mechanical clamp (33 Little Giant; Handler Manufacturing, Westfield, NJ) for 24 hours. The flask-clamp assembly was immersed in a de-waxing unit (Aman International Ahmedabad, Gujarat, India) at 92℃ for 5 min and de-waxing procedure was carried out in a conventional manner. Complete wax elimination was ensured from the cast, metal framework and investing-plaster surface (Fig. 4).
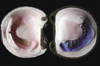
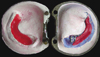
A double-thickness hard baseplate wax (Modeling wax hard; Deepti Dental Products, Ratnagiri, India) was adapted on the meshwork of metal framework and the de-waxed cast surface (invested in the base flask). The baseplate wax was also adapted on the de-waxed teeth-surfaces and the investing plaster surface (in the counter flask) (Fig. 5). The wax-sheets were adapted on areas corresponding to the future hollow space of the obturator prosthesis. Wax-sheet adapted on the dewaxed plaster surface (in the counter flask) was cut to create 3 - 5 widely located windows (approximately 3 mm × 3 mm in size) depending upon the surface area (Fig. 6). Vaseline petroleum jelly (Unilever, Australia) was applied to both adapted wax sheets as a separating medium. A wax-bolus was formed by softening the hard baseplate wax in hot water (60℃) sufficient enough to accommodate free hollow space between the two adapted wax-sheets after closing the flasks. The softened wax-bolus placed on to the adapted wax-sheet in either flask and both flasks were closed in close approximation under the mechanical clamp. The flask-clamp assembly was kept under cold water (20℃) for 10 minutes. The base and the counter flasks were separated, excess wax flash was removed and the flasks were closed again to ensure complete closure. The softened wax-bolus, meanwhile, completely occupies the hollow space between two adapted wax sheets. The wax-bolus was removed and examined for stops (or elevations) analogous to windows in adapted wax-sheet in the counter flask (Fig. 7). The wax-bolus was kept under cold water for 10 minutes to acquire hardness. The adapted wax-sheets were removed from both flasks. The hardened wax-bolus was positioned on to the counter flask to confirm the reseating with reference to the stops (Fig. 8). Except the stops the wax-bolus was uniformly (double wax-sheet thickness) away from the plaster surface. Three identification lines were drawn with a marking pencil on the wax-bolus, directed towards centre of the three indices (on the investment plaster in the base flask). These markings would guide initial orientation of wax-bolus during packing. Heat polymerizing acrylic resin (Lucitone 199, Dentsply, York PA, USA) was mixed following the manufacturer's instructions and packed into the counter flask (in dough stage) covering entire de-waxed surface. The wax-bolus was first oriented according to the guide-markings and then pressed on the packed-acrylic-resin till all the stops rested in previously confirmed position on the investing-plaster surface (Fig. 9). The mixed acrylic resin was also placed on the metal meshwork in the base flask and closed with the counter flask in close approximation under the mechanical clamp.
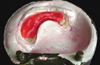
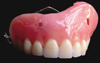
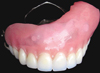
The flask-clamp assembly was kept at room temperature (25℃) for 24 hours for early bench polymerization of the heat polymerized acrylic resin before any temperature rise occurs. Curing cycle was carried out as per the manufacturer's instructions (at 165°F for 12 hours). The flask-clamp assembly was again kept at room temperature for 24 hours (bench cooling) after completion of the curing cycle. The flasks were separated after bench cooling. The three openings were produced (analogous to the stops) in processed resin-obturator. The wax-bolus, completely enclosed by the acrylic resin, partially got melted and came out of the resin-obturator through the openings during curing cycle. Remaining portion of the wax-bolus was removed by immersing the obturator in hot water (60℃) just to melt the wax inside the resin hollow-bulb followed by forceful cleaning with steam cleaner (Grobet USA, Carlstadt, NJ). The forceful steam was applied through one of the holes to remove the remaining portion of the melted wax-bolus through remaining holes, thus automatically forming a hollow space exactly similar to the shape of the wax-bolus (Fig. 10). Care was taken not to immerse the obturator in hot water (to melt the wax) for longer period of time to prevent any distortion of the prosthesis. The processed hollow obturator was finished and polished conventionaly.42 The three holes were sealed with autopolymerizing acrylic resin (Fig. 11). Necessary adjustments were made to fit the prosthesis intraorally. The prosthesis was delivered to the patient with reinforcement of post-insertion care and recalled at the interval of 3 months for initial one year followed by every 6 months. The prosthesis fabricated with the described technique was serviceable for last 4 years (Fig. 12).
DISCUSSION
This article described a new, relatively simple and less time-consuming technique to fabricate a closed hollow obturator. Several techniques and materials have been described previously to fabricate a lightweight, hollow obturator.9,11,16-40 To grind out the interior of the bulb after processing while maintaining the thickness of the walls was the basic classic technique used for hollowing an obturator.16 To fasten the lid to the superior border of the hollow space was also one of the frequently practicing technique.16-18 A removable lid was also tried in some situations.12 Materials such as sugar16,19 and ice17 were used to create the hollow space inside the processed resin. Processing the two halves the obturator separately followed by joining them with an autopolymerizing resin was well explained.20,21 Two-step processing technique,9,11 using preformed plastic shapes22 or plaster matrix23,27 were tried by some authors. The acrylic resin shim24 and a polyurethane foam25 were incorporated into the defect area during packing to create hollow space by some authors. Worley and Kniejski26 described a method for the fabrication of a closed hollow obturator while controlling the thickness of the hollow portion. However, the asbestos used by them rendered this technique unacceptable by current health and safety standards. Additional techniques with use of combinations of impressions, casts and multiple laboratory procedures rendered them time-consuming and limited in application.28-39
The predictable internal dimension of the hollow space cannot be achieved (to provide uniform wall thickness for hollow obturator) by most of the techniques previously described. Few techniques, with which the uniform wall thickness can be achieved, are complex and time-consuming. The technique described in this article is superior to all other techniques previously described in two ways: 1) It gives the complete prosthesis as a single unit in a heat cured acrylic resin and 2) Size and shape of the hollow space achieved allow uniform wall thickness for closed hollow obturator. This technique is a variation of some previously described techniques16,17,19,22,24,25 which comprises the use of a pre-shaped wax-bolus to maintain a predictable internal dimension of a hollow space.
The ability of this technique to provide a predictable internal dimension of hollow space to achieve uniform wall thickness for closed hollow obturator in one-step processing procedure justifies its novelty. One step processing in heat cured resin as a single unit with predictable internal dimension of the hollow space is the characteristic feature of this technique. Some of the issues regarding the technique should be carefully handled to achieve the best possible results and discussed as follows:40 1) The difficulty of reliably seating wax-bolus in polymerizing resin during packing procedure to maintain the uniformity of resin thickness is one of the concerns with the technique. Some kind of identification markings on the investment plaster or flask walls correlating the corresponding markings on the wax-bolus surface can guide reliable initial orientation of the bolus during packing. 2) Chances for dimensional change in the wax-bolus resulting from curing temperature to adversely influence the uniformity of resin thickness. The time left for the early bench polymerization of the heat polymerized acrylic resin prosthesis before any temperature rise occurs eliminates this problem. 3) There may be a risk of displacing the wax-bolus during final closure of the flask. The sufficient hardness of the wax-bolus on cooling and reliable seating during final closure may reduce this risk. 4) Dimensional changes and properties of the processed resin resulting from this technique may be one of the major issues. We have used this technique for fabrication of both definitive and interim closed hollow bulb obturators for 19 patients in last 4 years in our hospital. All the prostheses have been fabricated well with clinically acceptable properties of the processed resin except two which had to be reprocessed on account of generalized porosities. Future studies are suggested to evaluate the material properties of the resin after processing with this technique.


 XML Download